How Can We Help?
SIU VPN Guide
Overview
Virtual Private Network (VPN) provides access to the Campus Area Network from remote locations over the Internet. This allows resources that are normally only accessible from on campus to be reached from almost anywhere there is an Internet connection. VPN service is available to the faculty and staff for University business needs. In some cases, VPN is approved for SIU students with an academic need.
NOTE: You must request access to the VPN with the guide below first. If you have not requested access, you will not be able to connect.
How to Request VPN Access
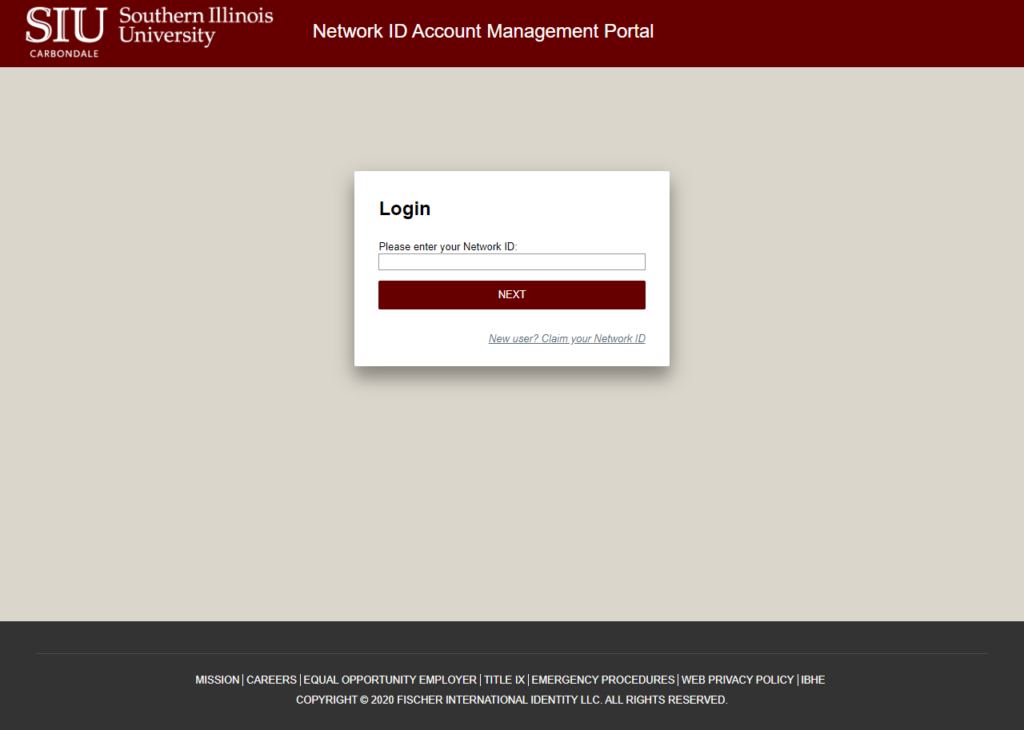
1. Log into the account needing VPN access at netid.siu.edu
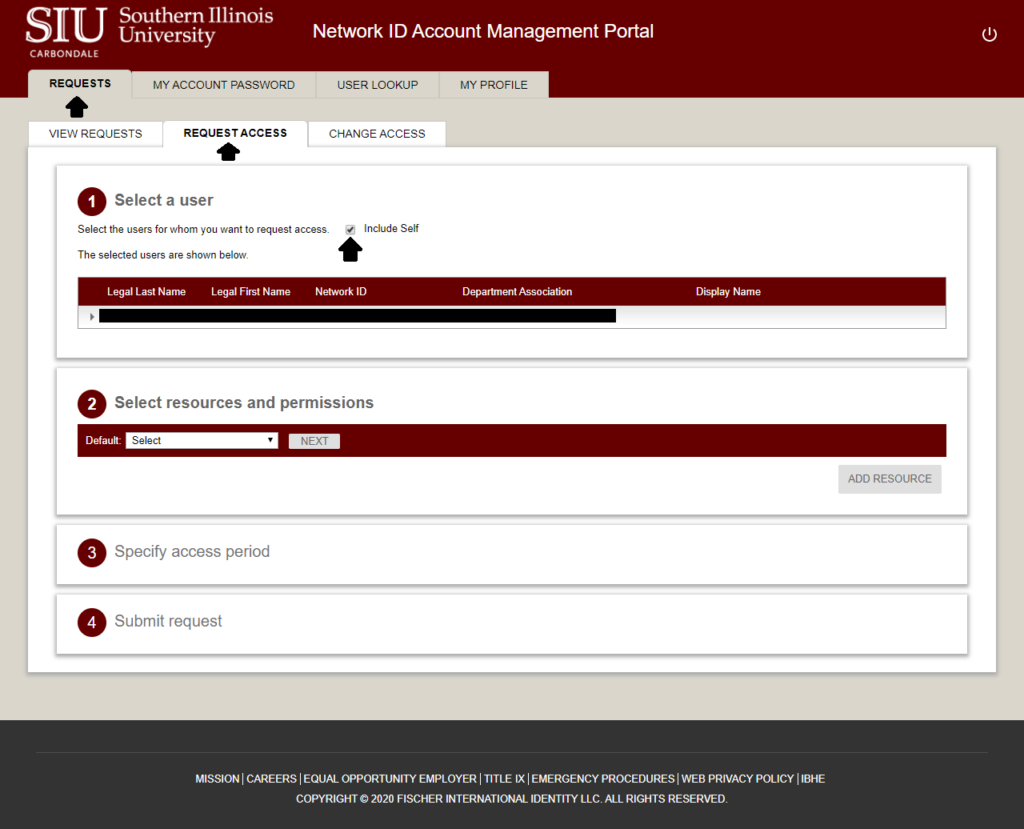
2. After logging in with your Network ID credentials, select ‘REQUESTS’ at the top of the page, then ‘REQUEST ACCESS’ and check the box next to ‘Include Self’.
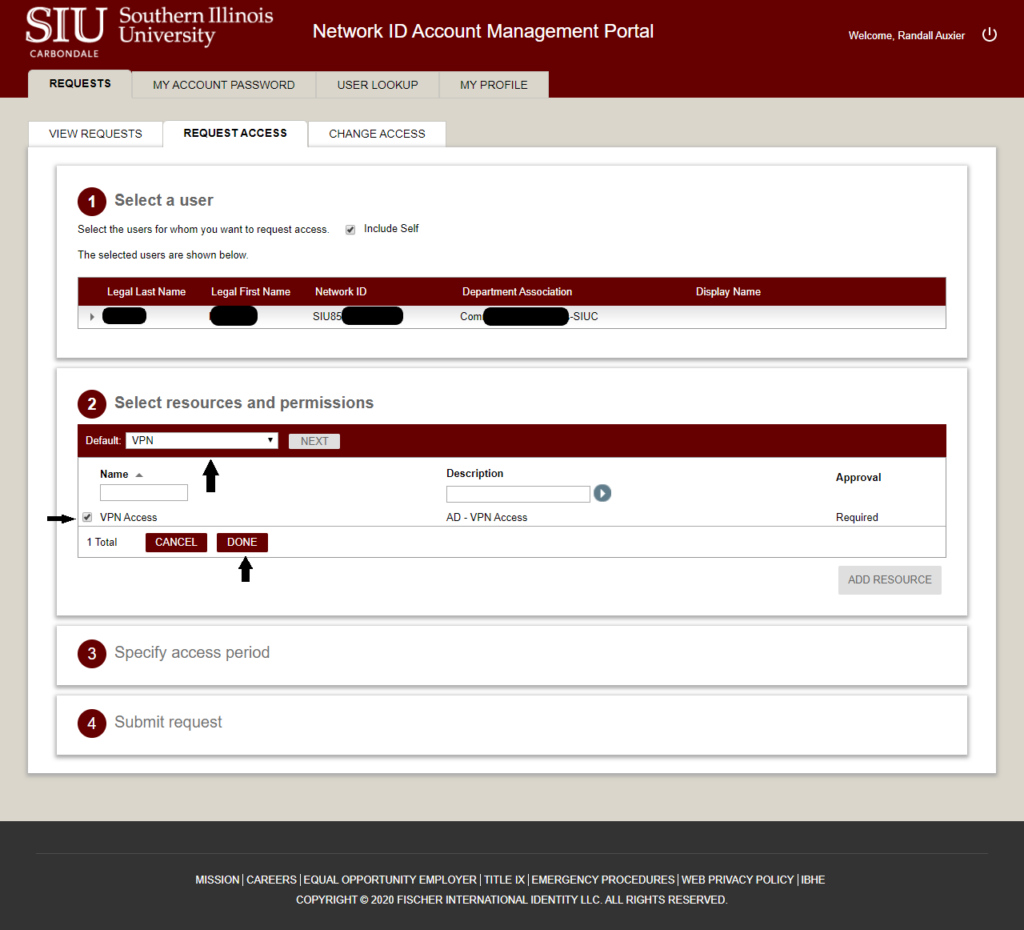
3. Select ‘VPN’ in the dropdown next to ‘Default’ and click ‘NEXT’, check the box next to ‘VPN Access’ and click the ‘DONE’ button.
4. VPN access is granted for a period of one year but can be extended by submitting a new request on or before the expiration date.

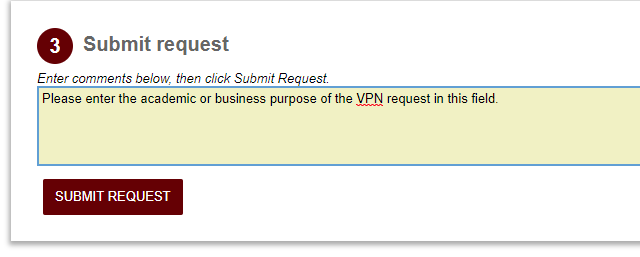
5. Enter the academic or business purpose that is served by your VPN access in the comments field and click ‘SUBMIT REQUEST’. You will not receive an email notifying you of a successful request.
Please Note: If you are currently employed by the University as Faculty or Staff your request will be automatically approved and you may proceed immediately to installing and logging into the VPN. For other users such as students, your request will be reviewed by the Information Security team and you will receive an email either approving or denying your request.
What do I use for the second password?
In the Second Password field, type one of the following options:
push = Send a push notification to the DUO app on your phone
sms = Send an SMS message with a code to your phone
XXXXXX = The 6-digit code generated by the DUO app on your phone or DUO token
Renewing VPN
If you were recently notified about your VPN expiring, you will have to request access again. This can be done before the expiration date.
See the instructions above to register for the VPN.
Checking VPN expiration date
To check your VPN expiration date you can do so by logging in at netid.siu.edu.

Once logged in, select the “requests” tab and then the “change access” tab.

After select change access, under the “select user or resource” section, check the checkbox titled “include self”. Your current access to various groups and policies will appear, with the start and end dates to the right. The resource named “VPN Access” will normally have an end date showing when your access will expire.
Setting up and Signing into the VPN
Before installing Cisco, make sure you have completed the VPN request process and have approval for VPN access.
If you have any questions or need technical support, please contact SalukiTech by email at salukitech@siu.edu or over the phone at 618/453-5155.
Windows
Setting up VPN
- Download the Cisco AnyConnect client installer for Windows from here: Private.siu.edu . You will need to sign-in using your SIU Network ID (SIU85XXXXXXX) and password to access the download file.
In the Second Password field, type one of the following options: push for DUO push notification or sms to receive a code via text to use in the 2nd password field. Alternatively you can enter the 6 digit passcode provided in the DUO app on your device. - Find the Cisco AnyConnect file in your Downloads folder (or wherever you chose to save the downloaded file).
- Double-click the file to run the Cisco AnyConnect Secure Mobility Client Setup Wizard. A window simliar to the one below, should open.
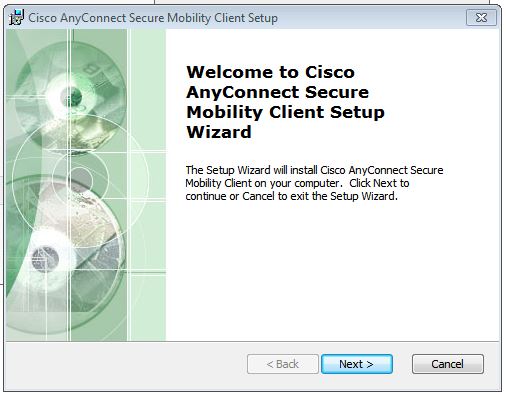
4. Click Next. You should be taken to a screen similiar to the one below, asking you to accept the EULA:
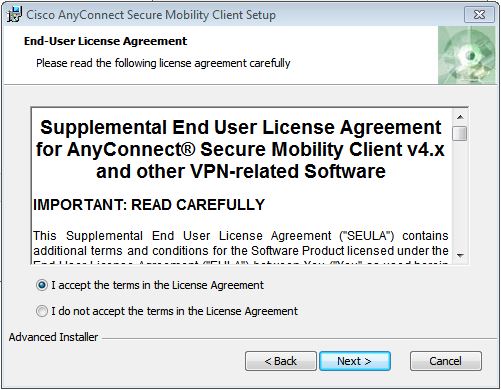
5. Click the radio button next to I accept the terms in the License Agreement to Accept. Then, click Next. You should be taken to an installation screen which resembles the following:
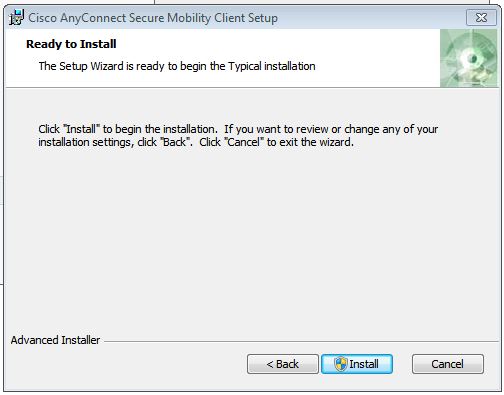
6. Click Install to begin the installation process. Once the process is finished, you will see a screen similar to the one below.
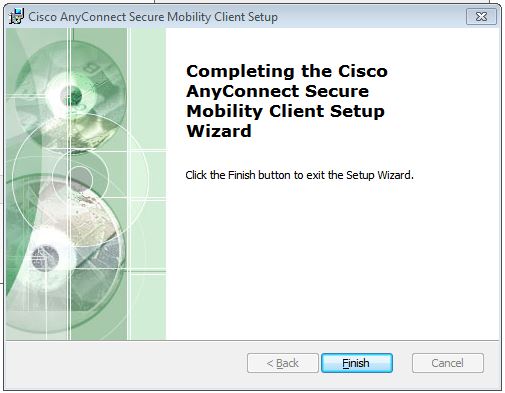
7. Click Finish to complete the installation process.
Signing into VPN
- Open the Cisco AnyConnect client on your Windows PC. If you do not see the AnyConnect icon in your taskbar, you can click the windows icon in the lower left of your screen and search for the Cisco AnyConnect application. You should see a window similar to that pictured below.

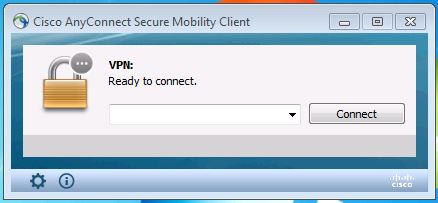
- Type the URL private.siu.edu into the Connect to: field that looks like a drop-down menu.
- Click the Connect button at the bottom of the window. This should direct you to the SIU Single Sign on page.
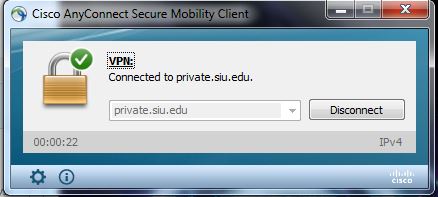
- Once you have signed in and authenticated you will now be connected to the vpn.
Mac OS
Setting up VPN
- Download the Cisco AnyConnect client installer for MacOS from here: Private.siu.edu . You will need to sign-in using your SIU Network ID (SIU85XXXXXXX) and password to access the download file.
- Open the .dmg file you downloaded by double-clicking on the file in the download location (or wherever you chose to save the downloaded file).
- You should now see the Mac OS X Anyconnect installer .pkg file. Double-click this file to begin the installation process.
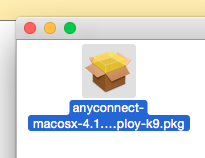
4. You should be presented with the Install AnyConnect Secure Mobility Client installer window. Click Continue.
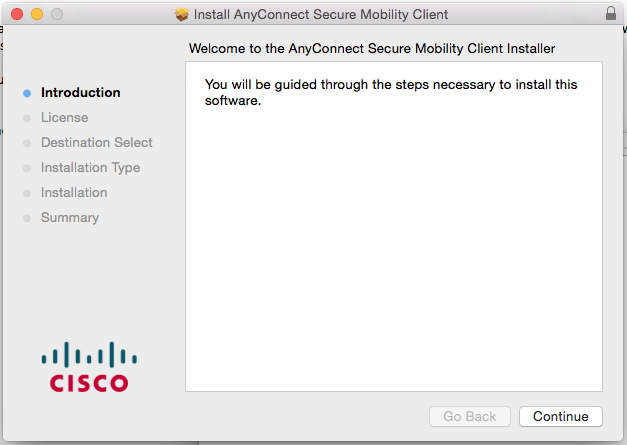
5. You will be taken to the Software License Agreement page. Click Continue.
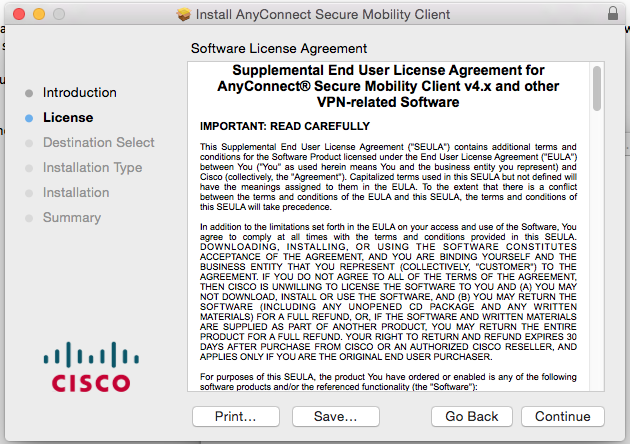
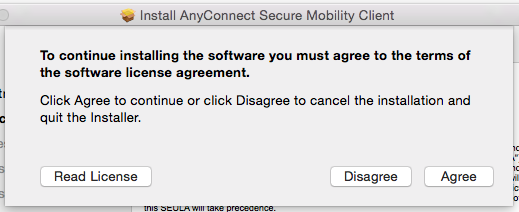
6. In order to continue the installation, you must agree to the terms of the license agreement. Click Agree.
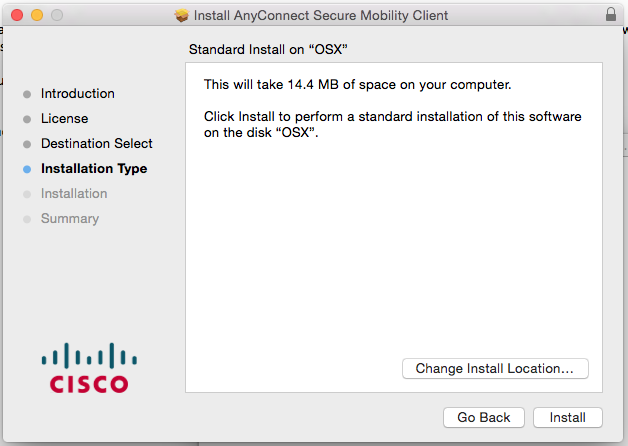
7. You will be given the option to Change Install Location. Normally the default install location is fine. Click Install.
8. You will need to authenticate with administrative privileges in order for the installation to continue. Enter your local administrative account information and click Install Software.
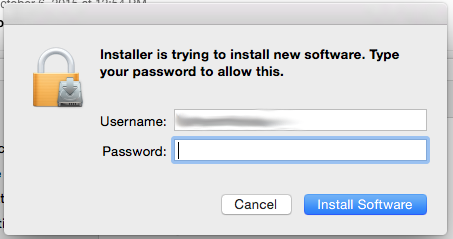
9. Cisco AnyConnect Secure Mobility Client will install and when finished, you should see a screen similar to the following.
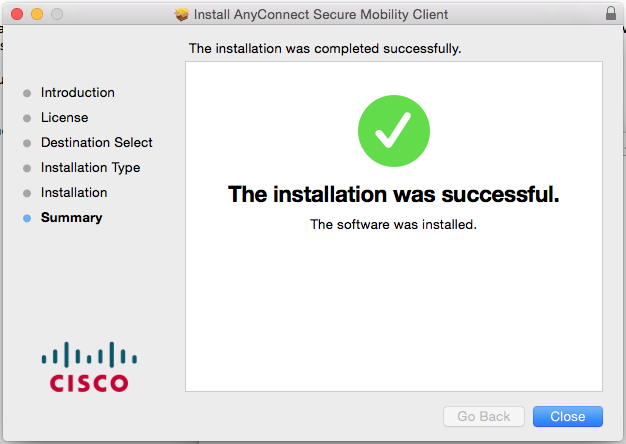
10. Click Close to complete the installation process.
Signing into VPN
- Open the Cisco AnyConnect client by clicking the AnyConnect icon in your Applications folder.
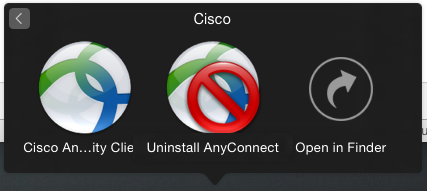
- You should see a screen similar to the following. Enter private.siu.edu into the blank field and click the Connect button.
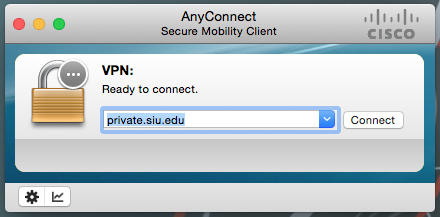
- Click the Connect button at the bottom of the window. This should direct you to the SIU Single Sign on page.
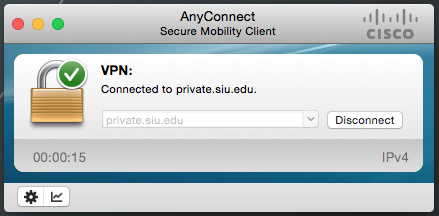
Once you have signed in successfully you should be connected to the SIU Cisco VPN. You will see a screen similar to the following, confirming you are connected to the VPN.
IOS
Setting up and signing into the VPN
1. Open the App Store application on your iOS device.
2. Click the “Search” option and type “anyconnect”.
3. Click “anyconnect” in the search suggestions menu.
4. Click the “+Get” option in the upper right-hand corner of the screen.
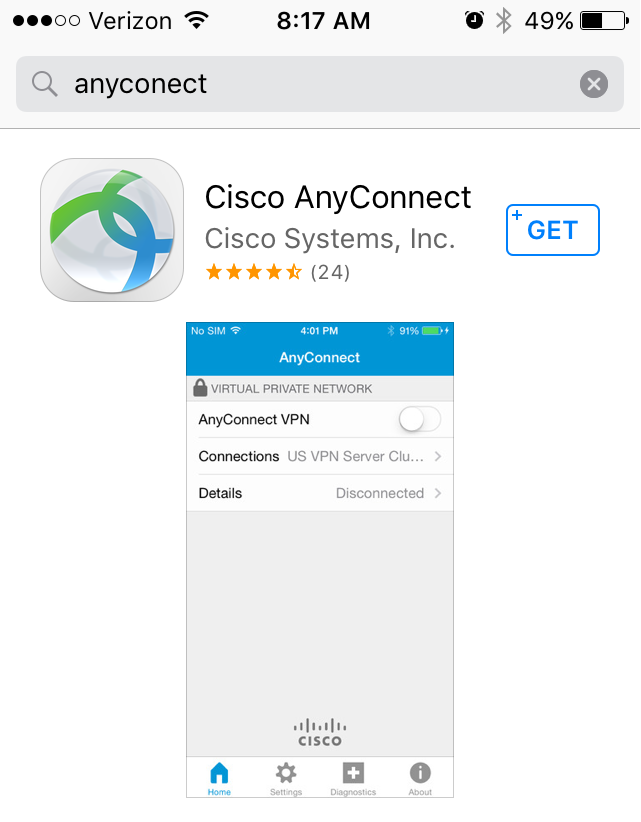
5. Click the “Install” option in the upper right-hand corner of the screen.
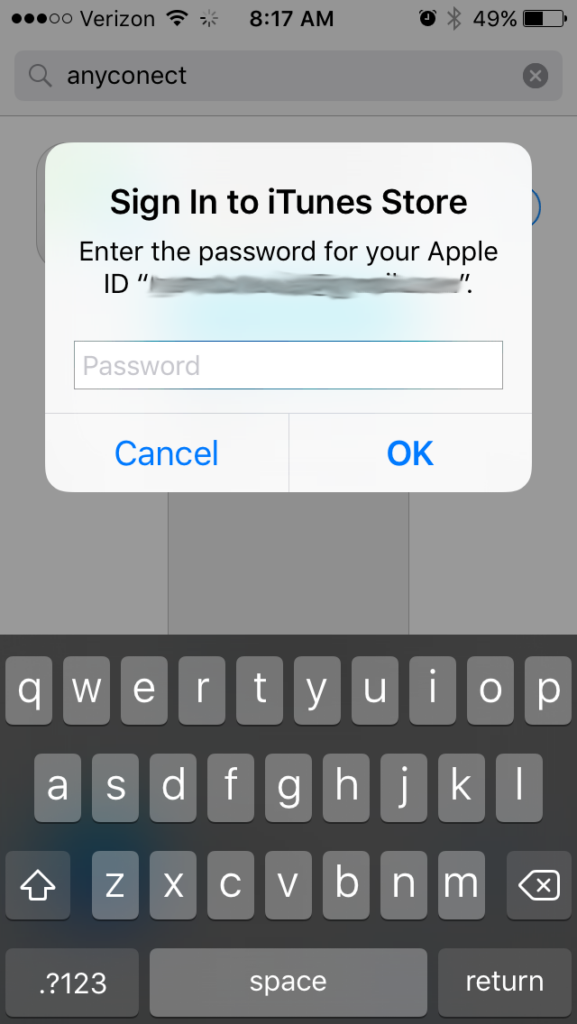
6. Sign in to your Apple account, if prompted, to download the AnyConnect application.
Step 7: Once the AnyConnect application has downloaded, open it by clicking the icon.

8. You are presented with a message asking whether you would like to enable the VPN software. Click the “OK” option.
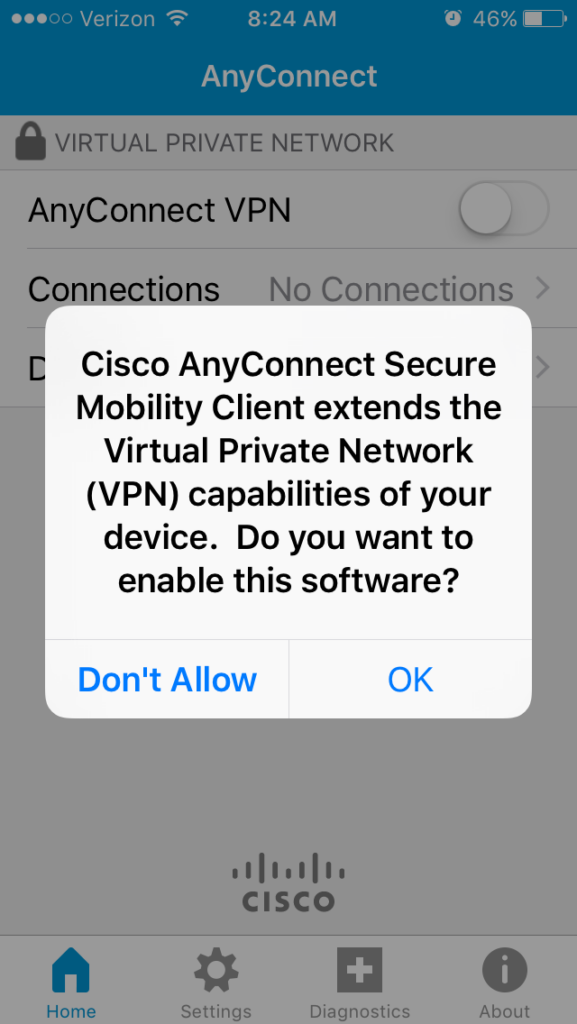
9. You are now at the AnyConnect initial screen. Click the “Connections” option.
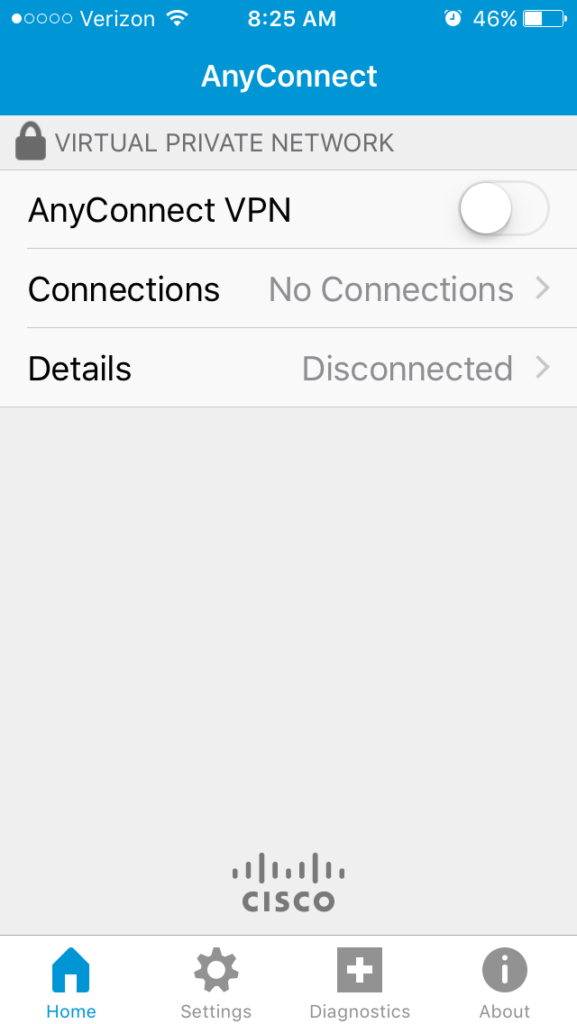
10. Click the “Add VPN Connection…” option.
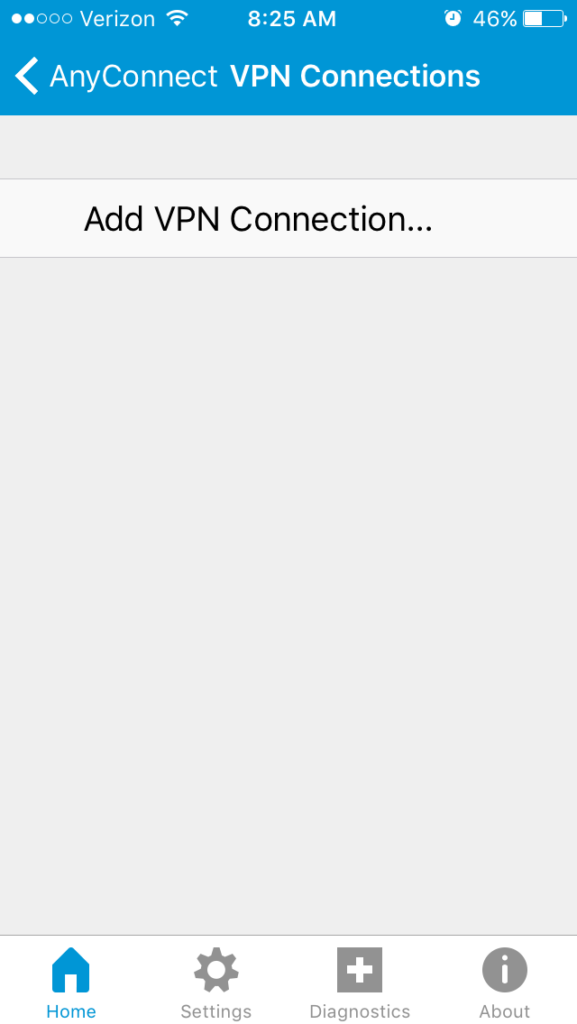
11. (Optional): Enter a description for the new VPN connection in the Description field.
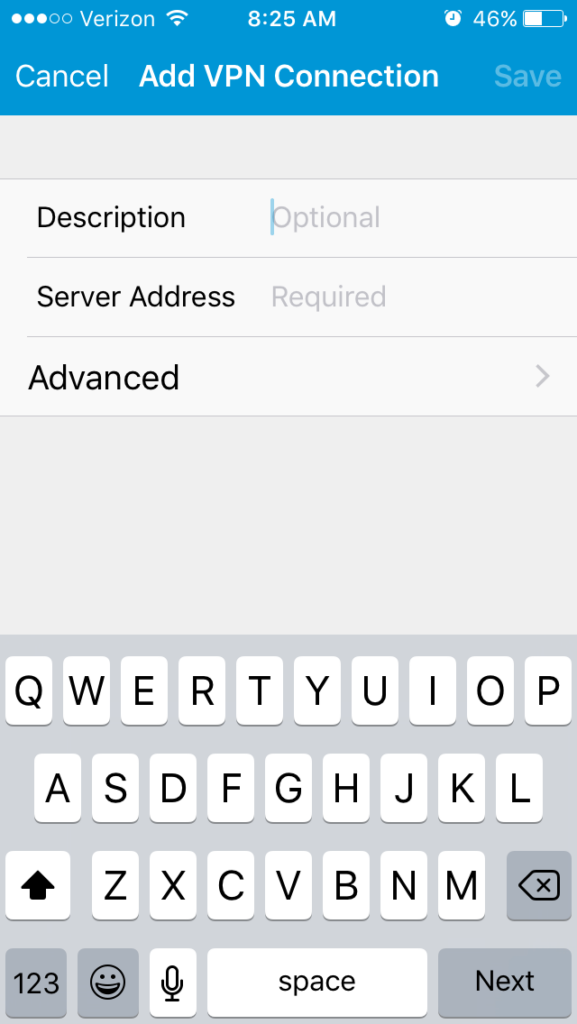
12. Enter “private.siu.edu” into the Server Address field.
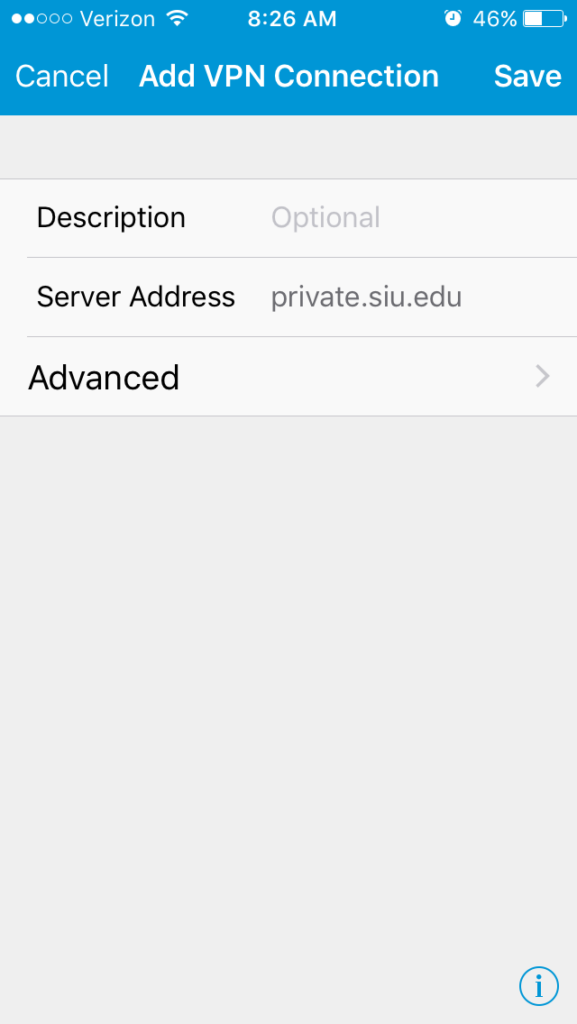
13. Click the “Save” option in the upper right-hand corner of the screen.
14. Click the back arrow to return to the initial AnyConnect screen.
15. Turn the switch next to AnyConnect VPN to “ON”.
16. You will be prompted to enter your SIUC Cisco VPN credentials. Enter your SIU network ID (siu85XXXXXXX) and password into the Username and Password fields.
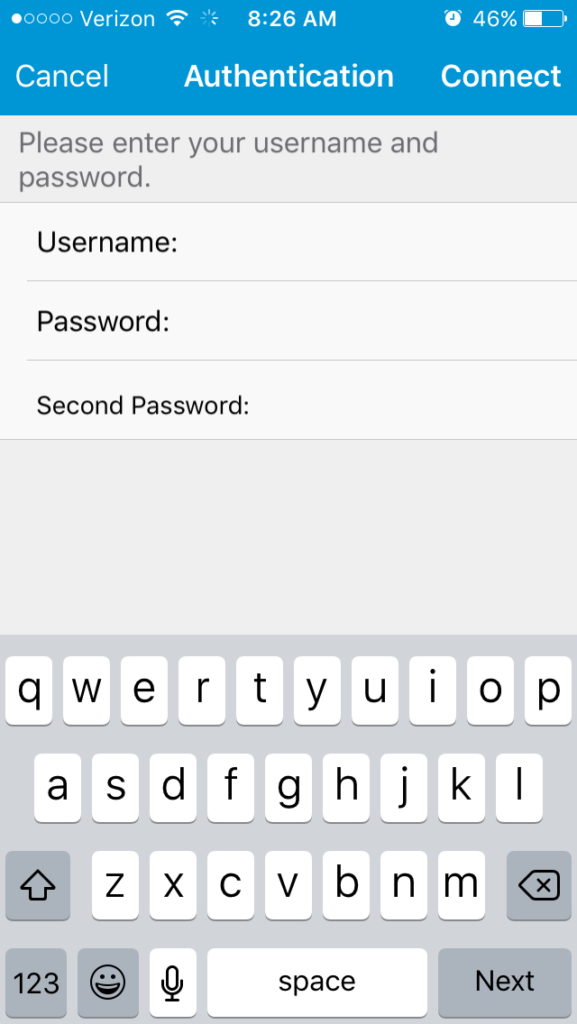
17. Enter one of the following options into the Second Password field:
push = Send a push notification to the DUO application on your phone
sms = Send a SMS message to your phone with a DUO passcode
XXXXXX = The six-digit code generated by the DUO application on your phone or DUO Token
18. Once you’ve signed in you should now be logged into the SIUC Cisco VPN from your iOS device.
Android
Setting up and signing into VPN
- Search for and download Cisco AnyConnect in the Google Play store.
- Open the AnyConnect client application on your phone or tablet.
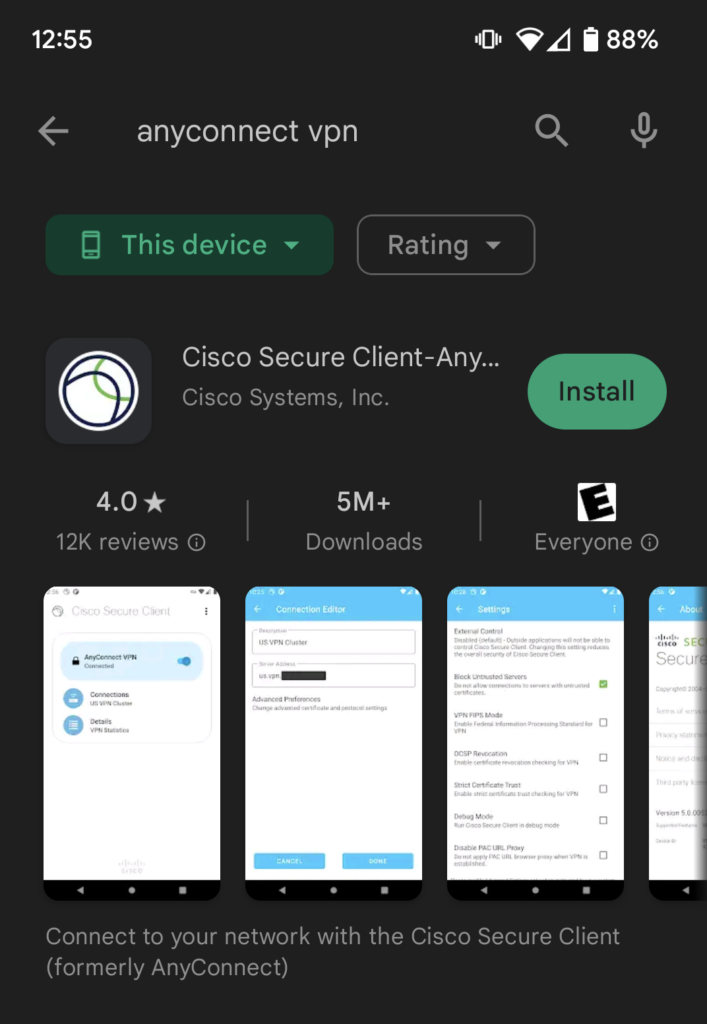
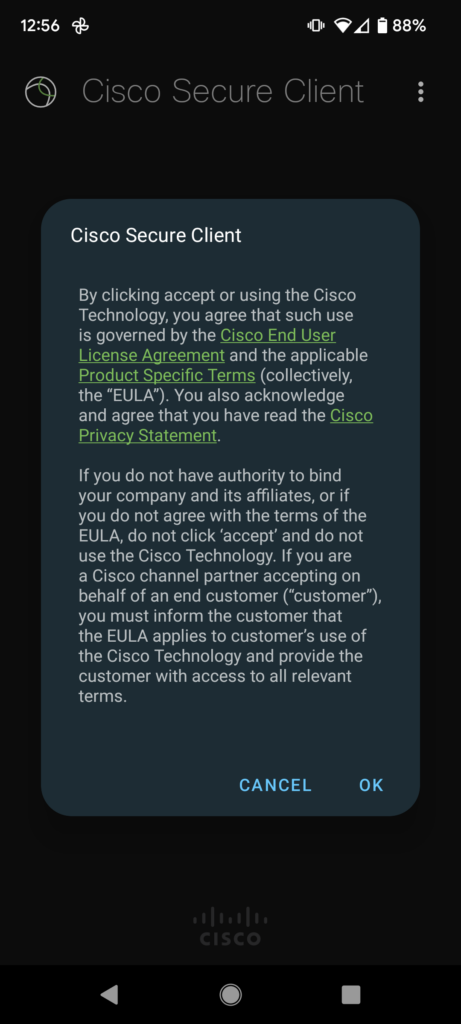
3. The first time opening the app you will be asked to agree to the cisco end user license agreement. Select OK to continue.
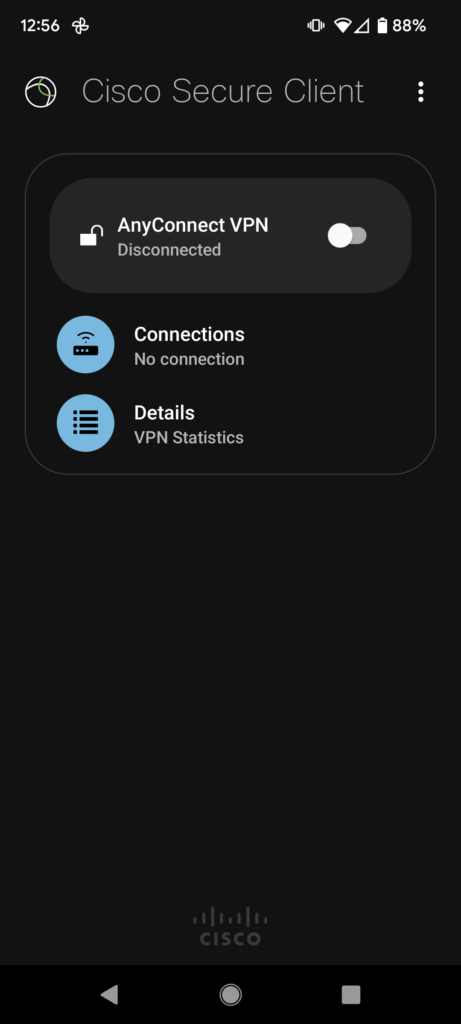
4. Once on the home screen of the AnyConnect app select “Connections”
5. Select the “+” at the bottom right to add a new VPN connection.

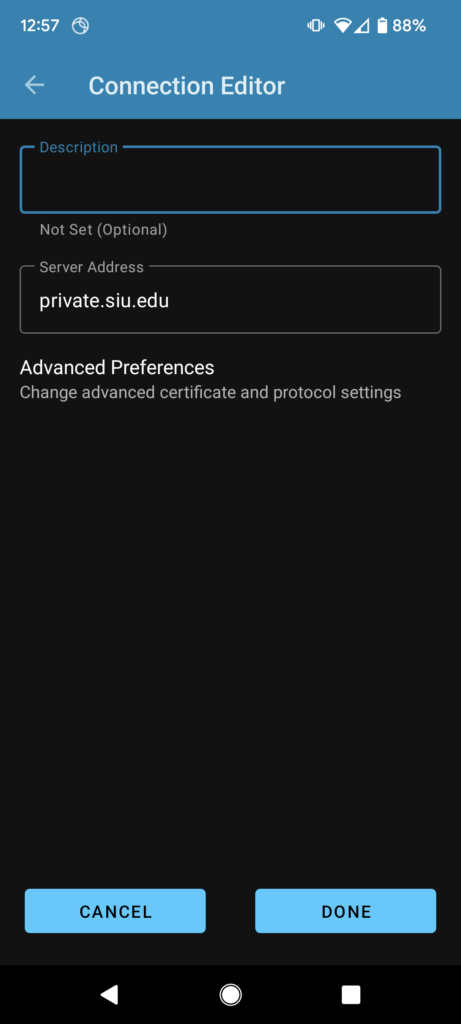
6. You will now be on the Connection Editor page. From here you can give a name to the VPN in the description field (optional). In the “Server Address” field, you will need to put in the vpn address:
private.siu.edu
Select “DONE” at the bottom right after you’ve put in the server address.
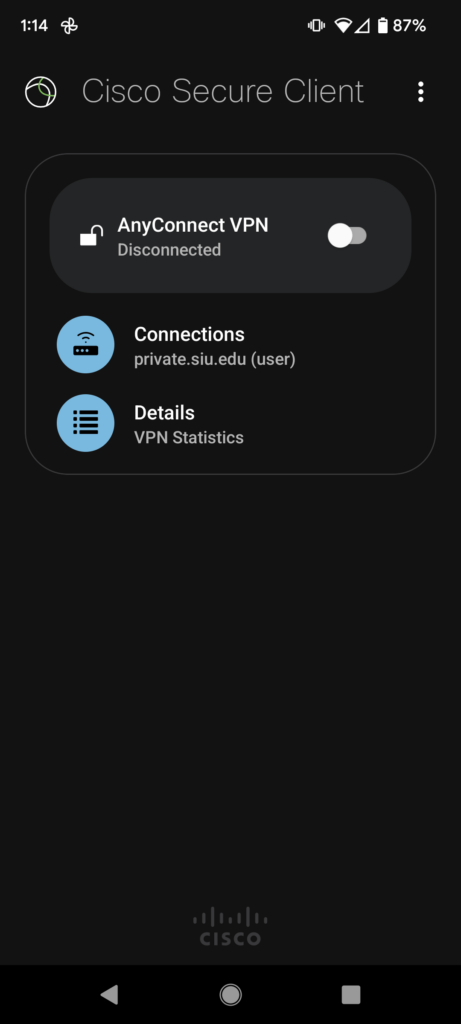
7. You should now be back on the AnyConnect home page. Select the toggle switch to the right of the “AnyConnect VPN” section to connect to the VPN.
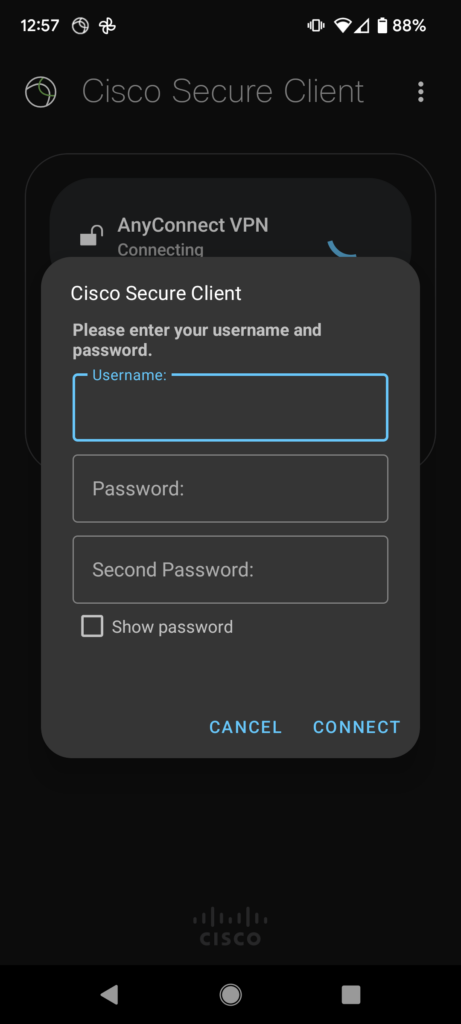
8. You will be prompted to enter in your login information.
Enter your SIU network ID (siu85XXXXXXX) in the Username field. Enter your SIU network ID password in the Password field. In the Second Password field, type one of the following options:
push = Send a push notification to the DUO app on your phone
sms = Send an SMS message with a code to your phone
XXXXXX = The 6-digit code generated by the DUO app on your phone or DUO Token
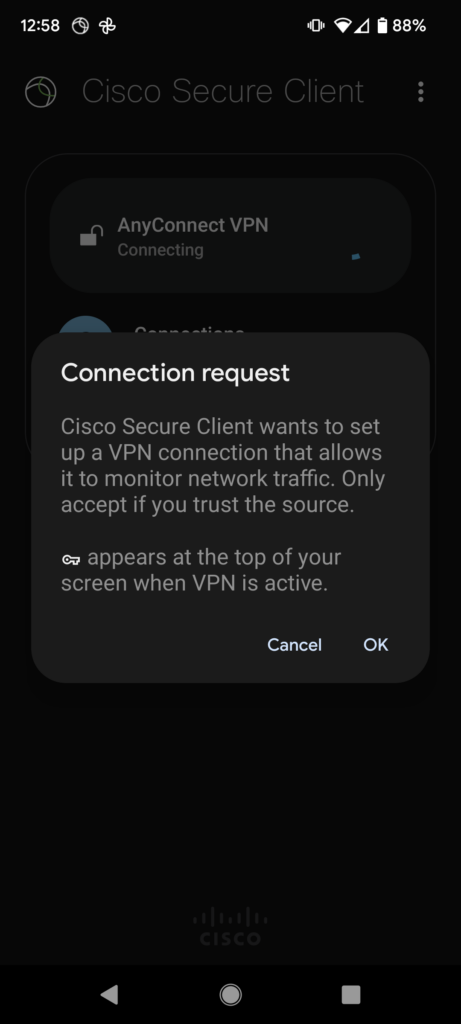
9. You will be shown a notification of a connection request. Select “OK” to continue connecting to the VPN.
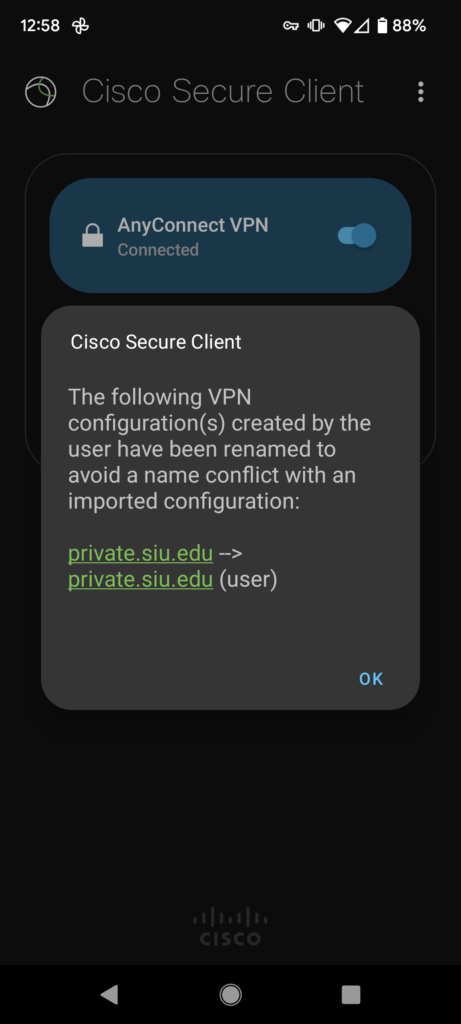
10.You may be given a notification of the connection being renamed if you did not enter in a description. Select “ok” to continue.
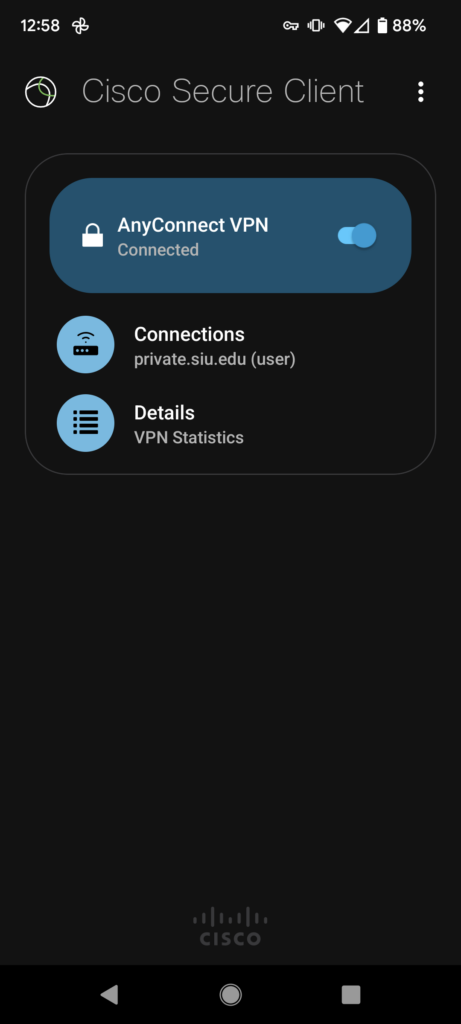
11. You are now connected to the VPN. You can see in the below example where it shows “connected” underneath the AnyConnect VPN section.
To disconnect from the VPN, open the AnyConnect app and toggle the button next to “Anyconnect VPN” to disconnect the VPN.
Linux
Setting up and signing into the VPN
1. Download the Cisco AnyConnect client installer for Linux here: private.siu.edu
If you don’t have Sun Java it will just sit at the Java Detection step
You will need to log in using your SIU network ID (siu85XXXXXXX) and password to access the download.
2. Open a terminal with sudo privileges.
3. Change directories to the same location where you downloaded the AnyConnect installer file.
4. Enter the command chmod +x vpnsetup.sh to grant executable permission to the file you downloaded.
5. Enter the command sh ./vpnsetup.sh to install the Cisco AnyConnect client.
6. Navigate to your programs and run the Cisco AnyConnect client. You should see a window which resembles the following:
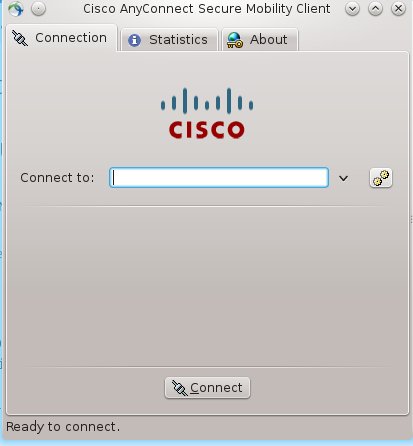
7. Type the URL “private.siu.edu” into the Connect to: field.
8. Click the “Connect” button at the bottom of the window.
9. You should see a window which resembles the following, prompting you for logon credentials:
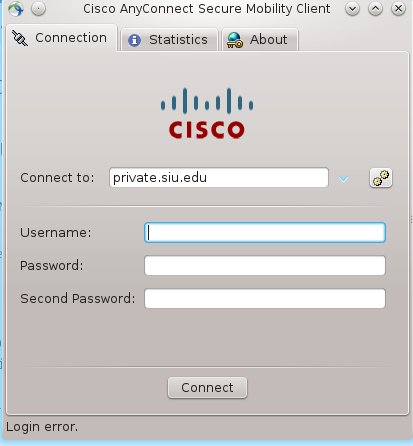
10. Enter your SIU network ID (siu85XXXXXXX) in the Username: field.
11. Enter your SIU network ID password in the Password: field.
12. In the Second Password field, type one of the following options:
push = Send a push notification to the DUO app on your phone
sms = Send an SMS message with a code to your phone
XXXXXX = The 6-digit code generated by the DUO app on your phone or DUO Token
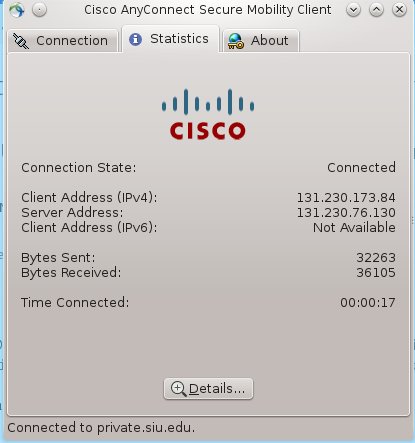
13. Click “Connect” You should now be logged into the vpn and you should be seeing a similar window to the following listing the details of your VPN Connection.
