How Can We Help?
-
Featured Issues
KB articles focusing on current problems and critical resolutions.
- Adding a Sharp Printer to a Personal Computer
- Adobe Sign in Acrobat Pro Basics
- Class Technology Troubleshooting
- Connecting to SIU Limited a Smart Device or Game Console
- Firewall Rule Request in Tikit
- Force Chrome and Edge to Download PDF Forms
- Force Microsoft Edge to Open a PDF Externally
- How do I print on campus?
- How to use User Codes with GFI Sharp Multi-function Printers
- I'm not receiving the email to reset my password from HRSS
- Making Calls in Microsoft Teams
- Requesting D2L Brightspace and Instructional Support Services from CTE
- Self Service Registration Guide
- SIUC LastPass
- Using Quick Assist
- Using VDI Computers on Campus
- Virtual Desktop Infrastructure (VDI) Guide
- Show all articles ( 14 ) Collapse Articles
-
Microsoft 365
Support topics related to Office365, and Microsoft Products
-
- Availability in Microsoft Teams
- Create a Microsoft Team for My D2L Course
- Download Teams on your Mobile Device
- Factory Reset Yealink MP54
- How to install Microsoft Teams on Iphone or Android
- Join Class Meeting on Teams
- Making Calls in Microsoft Teams
- Microphone doesn't work in Microsoft Teams
- Microsoft Teams Guide
- Scheduling Class Meetings in Teams
- Share a File with Microsoft Teams
- Sync Teams Channel Folder to One Drive on Local Device
- Teams Live Events
- Toggle Call Queues in Microsoft Teams
- Show all articles ( 11 ) Collapse Articles
- Access a Video File in Microsoft Stream
- Accessibility Checker in Microsoft Office
- Add a Delegate from O365 Web App
- Add your Office 365 Account to Outlook
- Blocked Email
- Clearing the Outlook Autocomplete E-mail Cache
- Create a Microsoft Form
- How do I add audio to my PowerPoint?
- How to check my M365 mailbox usage?
- How to install Office 365 from Software Center on SIU owned computers.
- Identifying and Reporting Email Scams
- Logging into Microsoft Forms
- Manage Share Settings in Microsoft Stream
- Microsoft Authenticator for current Students, Faculty & Staff
- Microsoft Authenticator for Retirees & Alumni
- Microsoft Bookings Guide
- Microsoft FindTime
- Microsoft Office Training and Support
- Microsoft Stream Recording/Sharing Processes
- Microsoft Word Guide
- My OneDrive Icon is Missing
- Office 365 for Android Devices
- Office 365 for iOS Devices
- Office 365 for Other Devices
- Office 365 for Windows Devices
- Office365 won't open .ics file
- OneNote Help & Training
- Remove Contact from Office 365
- Request a Room for Outlook/Teams Meetings
- Share a File with Microsoft Teams
- Share a File with OneDrive
- Share a Video File in Microsoft Stream
- Shared Mailbox
- SIU Email Signature Instructions
- Upload a File to Microsoft Stream
- Upload a File to OneDrive
- Video Chapters in Microsoft Stream
- Video Comment in Microsoft Stream
- Video Information in Microsoft Stream
- Video Thumbnail in Microsoft Stream
- Video Transcript in Microsoft Stream
- Virtual Fax Instructions
- Show all articles ( 39 ) Collapse Articles
-
-
D2L Brightspace
- Adding a Link In Announcement to Content
- Adding a Participant to Course in D2L
- Adding a Teaching Assistant (TA) to Course in D2L
- Brightspace Training Sessions
- Change Course Offering Information in D2L
- Copy Your Course Content from Previous Semester in D2L
- Create a Microsoft Team for My D2L Course
- Creating Break-Out Group Discussion Boards
- Creating Discussions in D2L (MyCourses)
- Creating/Editing Announcements in D2L (MyCourses)
- D2L Course Merge Guide
- D2L Intelligent Agents
- D2L Quick Guide: Using the Course Builder Tool
- Display Current Courses on D2L Course Homepage
- Echo 360 Instructor Guide
- Echo 360 Video Won't Play on Chromebook
- Emailing the Class in D2L (MyCourses)
- Formatting Guidelines for Respondus 4.0 Exam Converter
- Getting Help with D2L
- Getting Started with Creator + in D2L
- Give Students Special Access to Course Quiz in D2L
- Grading Tool in D2L (MyCourses)
- How do I randomize quiz questions in D2L?
- How to Access Quiz Feedback on D2L
- How to Add Instructor Profile on D2L Course Homepage
- How to Add Resources for Salukis Widget to a D2L Course Homepage
- How to Add Upload Content to your Course
- How to Attend a Virtual Classroom Session
- How to change course navigation from menu bar (list) to icon-based
- How to Change Participant Roles in D2L
- How to Create a Video Assignment in D2L
- How to Create Assignments in D2L
- How to Display Quiz Feedback on D2L
- How to Email Instructor and Classmates in D2L
- How to Get Started with Virtual Classrooms in D2L
- How to Give Students Special Access to Course Assignment in D2L
- How to Login and Navigate a course in D2L
- How to post a quiz with time restriction in D2L
- How to Post on Discussion Boards in D2L
- How to Set-up Notifications in D2L (students/learners)
- How to Take Quizzes in D2L
- How to Upload Assignments in D2L
- How to Use D2L Content
- How to Use D2L on Your iPhone or iPad
- How to Use D2L on Your Laptop
- Import a Course from Another Learning Management System
- LockDown Browser and Respondus Monitor Instructor Guide
- Lockdown Browser Guide for Students
- Readspeaker in D2L
- Requesting D2L Brightspace and Instructional Support Services from CTE
- Setting Up Assignments and Linking to the Gradebook in D2L (MyCourses)
- SIU Live Recording
- This Quick Guide will help you learn How to Add a Participant to Course in D2L
- Using CopyLeaks in D2L
- Using Respondus 4 with VDI
- Work to Do Widget in D2L
- Show all articles ( 53 ) Collapse Articles
-
Account Help
Login support for all SIU accounts.
- Account Lockouts
- AIS reports not opening with Word
- BigDawg Access
- Changing Display Settings in Windows
- Changing Preferred First Name or Email Address
- Claim your Network ID
- Connecting to Eduroam with Mac OSX
- Departmental ID or Out-of-band (OOB) Network ID Account
- How do I access my SIU email?
- How Do I Change My SIU Account Password?
- How to add a shortcut in file explorer to a OneDrive folder
- How to sign into a Teams Phone
- How to Update Your Recovery Information
- How to View Telecom Billing
- Instructions for changing database connections in Golden
- Microsoft Authenticator for current Students, Faculty & Staff
- Microsoft Authenticator for Retirees & Alumni
- Office 365 - Modify members of a distribution list (OWA)
- Parent Proxy Information and Tutorials
- Passwordless MFA Sign-in (Android)
- Proxy Help
- SalukiNet Proxy FAQ's for Students
- Setting up a Network ID account for a Local Administrator
- SIU Network ID-General Information
- SIUC LastPass
- Troubleshooting the Housing Portal
- Using the Electronic Whiteboard and Document Camera
- What is my SIU email address?
- Yubikey Hardware Device Instructions - MacOSX
- Yubikey Hardware Device Instructions - Windows
- Yubikey Hardware Instructions - Linux
- Show all articles ( 28 ) Collapse Articles
-
Remote Access
Access to SIU's VPN, Remote Desktop Access, and Virtual Desktop Instances.
-
WiFi and Internet
Network and Internet connectivity issues, for SIU supported networks and off-campus SIU device connectivity.
- Account Lockouts
- Connecting to Eduroam with Android devices
- Connecting to Eduroam with Apple Iphone or Ipad
- Connecting to Eduroam with Linux
- Connecting to Eduroam with Windows
- Connecting to SIU Limited a Smart Device or Game Console
- Connecting to SIU-Guest
- Eduroam Support for Older Devices
- How do I clear my browser cache and cookies?
- Secure a Compromised Email Account
- SIU Wireless Connection Guide
- Troubleshooting Eduroam for IOS devices
- Troubleshooting Eduroam for Mac devices
- Troubleshooting Eduroam for Windows Devices
- Show all articles ( 11 ) Collapse Articles
-
SIU Digital Services
Support for online resources, such as MoveIT, HRSS, SalukiNet, and more.
- AIS PDF authentication error
- AIS reports not opening with Word
- Golden Software Help
- How to Obtain an Unofficial Transcript
- Instructions for changing database connections in Golden
- Lockdown Browser Guide for Students
- MOVEit User Guide
- Setting Up a Google Analytics Account with an SIU Email Address
- Setup Weekly Identity Scan for Spirion
- Spirion Identity Finder
- Working Remotely
- Show all articles ( 8 ) Collapse Articles
-
Computer Help
General SIU Computer Topics
- Adding a Sharp Printer to a Personal Computer
- Apple/Mac, Big Sur OS Breaks AIS Report Viewing/Printing
- Blue Screen Printing Fix
- Class Technology Troubleshooting
- Connecting to SIU Limited a Smart Device or Game Console
- Finding Computer Name on a Mac
- Finding Computer Name on Windows
- Force Chrome and Edge to Download PDF Forms
- Force Microsoft Edge to Open a PDF Externally
- How do I clear my browser cache and cookies?
- How do I open a private web browser window?
- Learn about ithelp portal
- Local Repair Facilities
- MOVEit User Guide
- Parent Proxy Information and Tutorials
- Restoring Firefox Bookmarks
- Secure a Compromised Email Account
- Setup Weekly Identity Scan for Spirion
- SIU Email Signature Instructions
- SIU Live Recording
- SIU VPN Guide
- Troubleshooting projector issues in CLC classrooms
- Using Quick Assist
- What computer should I buy?
- Working Remotely
- Show all articles ( 22 ) Collapse Articles
-
FAQs
Category description
- Adding a Sharp Printer to a Personal Computer
- Changing Preferred First Name or Email Address
- Golden Software Help
- How do faculty enter grades?
- How to get service or order supplies for your GFI Copier/Printer
- How to register for classes on mobile
- How to Use D2L on Your iPhone or iPad
- How to Use D2L on Your Laptop
- How to use the Microfilm Scanner at Morris Library
- How to use User Codes with GFI Sharp Multi-function Printers
- I received an email titled "Action Required: Renew (course info)(semester) by (expiration date)"
- Identifying and Reporting Email Scams
- Mapping a Network Drive
- PDF not opening with Adobe
- Rebooting The KIC Book Scanner
- SalukiNet Proxy FAQ's for Students
- Self Service Registration Guide
- Unable to Sign into myfuture.siu.edu to Submit Application or Sign Up for Orientation
- What computer should I buy?
- What is my SIU email address?
- Show all articles ( 17 ) Collapse Articles
-
Mobile Device Support
A collection of topics for mobile devices like phones and tablets.
- Connecting to Eduroam with Android devices
- Download Teams on your Mobile Device
- How to install Microsoft Teams on Iphone or Android
- Microsoft Authenticator for current Students, Faculty & Staff
- Obtain access to a shared network file share via SMB on a iOS device.
- Office 365 for Android Devices
- Office 365 for iOS Devices
- Office 365 for Other Devices
- Passwordless MFA Sign-in (Android)
- Troubleshooting Eduroam for IOS devices
- Show all articles ( 7 ) Collapse Articles
-
Campus Printing
How to print on the Carbondale campus including mobile printing resources and from SIU equipment.
-
Software Guides
Support for SIU distributed software offerings.
- Activate SPSS Statistics
- Activate Wolfram Mathematica
- Adobe Acrobat Pro - Adding a Checkbox (with Either/or Options)
- Adobe Freezes While Adding Signature
- Adobe Sign in Acrobat Pro Basics
- Adobe Signature Box Fix - non-Entrust
- Create a survey with SurveyMonkey
- EMS Desktop Client Installation
- ERDAS IMAGINE 2022: Installation
- ERDAS IMAGINE 2022: Manual Installation
- Finding Computer Name on a Mac
- Finding Computer Name on Windows
- Install Adobe Acrobat for Personal Computers
- Install Adobe Creative Cloud for Personal Computers
- Install ArcGIS CityEngine
- Install ArcGIS Drone2Map
- Install ArcGIS Pro for Personal Computers
- Install EndNote
- Install JMP Pro
- Install MATLAB for Personal Computers
- Install Microsoft Azure Dev Tools for Teaching
- Install Microsoft Office 365
- Install SPSS Statistics
- Install Wolfram Mathematica
- Microsoft Company Portal
- Microsoft Company Portal
- PDF not opening with Adobe
- Qualtrics
- SAS 9.4M7 for Windows: Manual Installation
- SAS 9.4M8: Installation
- Sign In Adobe Acrobat Sign
- Sign In Adobe Express
- Sign in Adobe Firefly
- Sign In Adobe Fonts
- Sign In Adobe Stock
- Sign In ArcGIS Field Maps
- Sign in ArcGIS Online
- Sign in ArcGIS QuickCapture
- Sign In ArcGIS Survey123
- Sign In MATLAB Academy
- Sign In MATLAB Drive
- Sign In MATLAB Mobile
- Sign In MATLAB Online
- Sign In Simulink Online
- Sign In/Activate Adobe Acrobat
- Sign In/Activate Adobe Creative Cloud
- Sign In/Activate ArcGIS CityEngine
- Sign In/Activate ArcGIS Drone2Map
- Sign In/Activate ArcGIS Pro
- Sign In/Activate JMP Pro
- Sign In/Activate MATLAB
- Sign In/Activate Microsoft Office 365
- Software Request
- SPSS Amos 29: Installation
- SurveyMonkey
- Update MATLAB License
- Update/Refresh Microsoft Office 365 License
- Using VDI Computers on Campus
- Virtual Desktop Infrastructure (VDI) Guide
- Show all articles ( 56 ) Collapse Articles
-
Classroom Technology
KB articles focusing on the technology within SIU's smart classrooms
Create a survey with SurveyMonkey
0 out Of 5 Stars
| 5 Stars | 0% | |
| 4 Stars | 0% | |
| 3 Stars | 0% | |
| 2 Stars | 0% | |
| 1 Stars | 0% |
All human subjects research must be approved by the SIU IRB before data collection begins. Information related to the SIU IRB and the application process can be located at: https://orc.siu.edu/human-subjects-research/index.php
Overview
The Enterprise version of SurveyMonkey is now available by request. The easy-to-use software features a rich library of templates, thousands of professionally constructed survey questions, robust analytic capabilities, and a wide array of survey development tools.
SurveyMonkey also offers tutorials to get new users up to speed quickly. Users who are familiar with the free version of SurveyMonkey will discover the licensed version is far more flexible and powerful.
The university’s SurveyMonkey license will allow users with enterprise-level upgrades to:
- Add custom logos, colors, and survey URLs.
- Receive response notifications.
- Send unlimited surveys and questions and receive unlimited responses.
- Use question and page skip logic.
- Export data in CSV, PDF, PPT, SPSS, XLS formats.
- Accept payments.
- Integrate with popular collaboration apps.
- Create multi-lingual surveys.
- Track activity.
- Consolidate and analyze data.
Click for Best practice tips, along with other resources and online survey suggestions. You can also find great help inside SurveyMonkey by clicking the question mark at the top.
Adding an Introductory Page to your New Survey
1. In the top-left corner of your survey (in Design Survey mode) you will see a section for Page Title. Hover your mouse over the title text and click the Edit button that appears.

2. The Page Title section will open. If desired, you may choose to enter a Page Title.
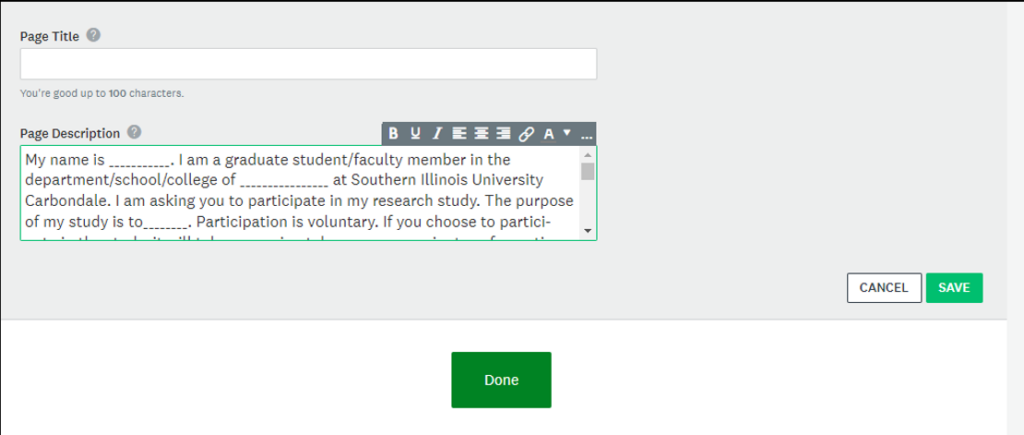
3. In the Page Description section, type or paste in the desired text. For example, you may need to include the approved Human Subjects information here if you are conducting a research project.
You may utilize the format bar to modify the appearance of the text or add hyperlinks.

4. When you are satisfied with the text, click the Save button.
5. If you need to make a change to the text, hover your mouse over the text like you did in Step 1 click the Edit button that appears.
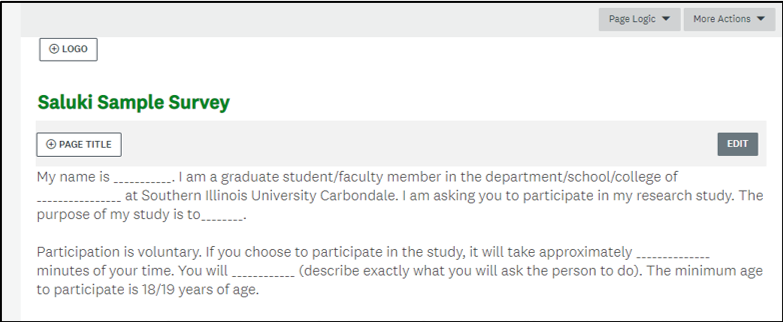
6. After you make the desired modifications, click the Save button.
7. To place your questions on a separate page, click the New Page button.

Adding an Introductory Page to your Existing Survey
1. Click the New Page button to add a new page.

2. If desired, you may choose to enter a Page Title.

3. In the Page Description section, type or paste in the desired text. For example, you may need to include the approved Human Subjects information here if you are conducting a research project.
You may utilize the format bar to modify the appearance of the text or add hyperlinks.

4. When you are satisfied with the text, click the Save button.
5. If you need to make a change to the text, hover your mouse over the text like you did in Step 1 click the Edit button that appears.

6. After you make the desired modifications, click the Save button.
7. From More Actions select the Move page option.

8. Select the appropriate location for the page by using the Position and Page drop-down menus.
For example, if you would like this Introductory page to be the very first item that users see, you will want the Position to be “Before” and the Page to be “1.”
9. Click the Apply button to move the page to the new location.

Making your Survey Anonymous
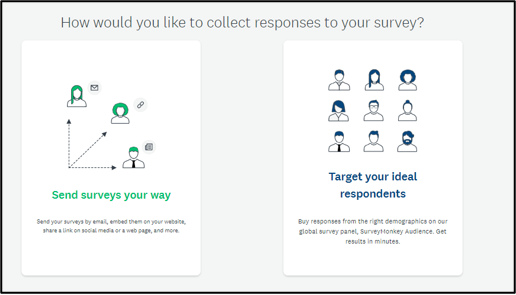
1. Click on the Collect Responses link at the top of the screen.

2. Select the method in which you would prefer to collect responses. Typically, you will select Send surveys your way.
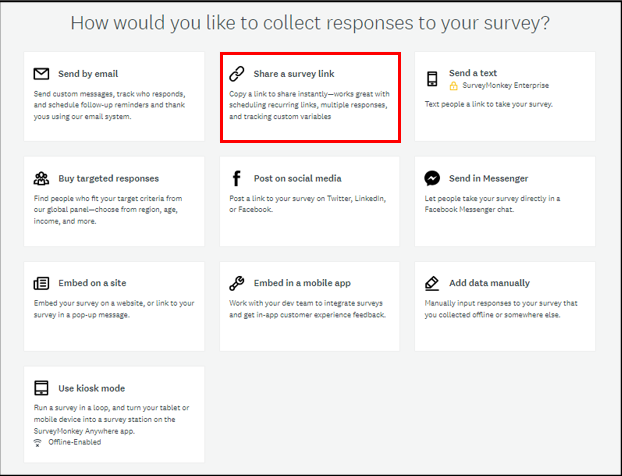
3. A variety of methods are available to collect responses. The instructions from this point forward will be referencing the Share a Survey Link option only.
4. Click the Anonymous Responses section to change the setting.
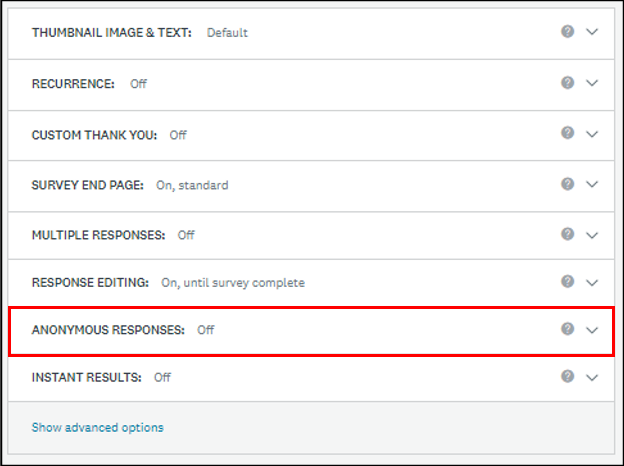
5. Select the On, your respondents will be anonymous option.

Displaying a Custom Thank You Message on your Survey
1. Click on the Collect Responses link at the top of the screen.

2. A variety of methods are available to collect responses. The instructions from this point forward will be referencing the Share a Survey Link option only.
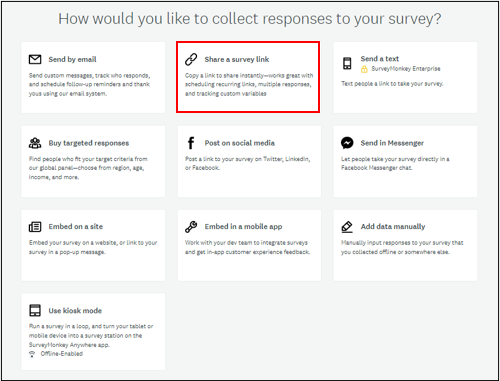
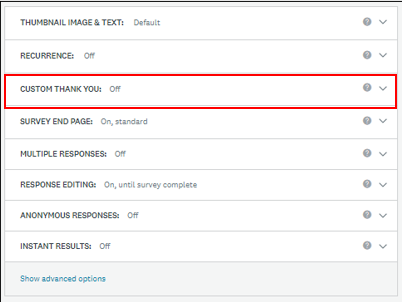
3. Click the Custom Thank You section to modify this content.
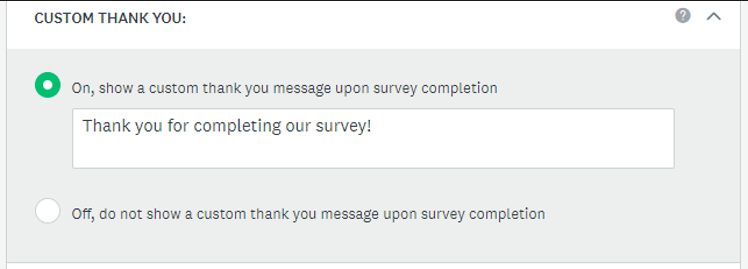
4. Select the On, show a custom thank you message upon survey completion option.
5. Enter the desired text in the text box.
0 out Of 5 Stars
| 5 Stars | 0% | |
| 4 Stars | 0% | |
| 3 Stars | 0% | |
| 2 Stars | 0% | |
| 1 Stars | 0% |
