How Can We Help?
-
Featured Issues
KB articles focusing on current problems and critical resolutions.
- Adding a Sharp Printer to a Personal Computer
- Adobe Sign in Acrobat Pro Basics
- Class Technology Troubleshooting
- Connecting to SIU Limited a Smart Device or Game Console
- Emergency Alerts
- Firewall Rule Request in Tikit
- Force Chrome and Edge to Download PDF Forms
- Force Microsoft Edge to Open a PDF Externally
- How do I print on campus?
- How to use User Codes with GFI Sharp Multi-function Printers
- I'm not receiving the email to reset my password from HRSS
- Making Calls in Microsoft Teams
- Proxy Account Setup
- Requesting D2L Brightspace and Instructional Support Services from CTE
- Self Service Registration Guide
- SIUC LastPass
- Student Proxy Setup
- Using Quick Assist
- Using VDI Computers on Campus
- Virtual Desktop Infrastructure (VDI) Guide
- Show all articles ( 17 ) Collapse Articles
-
Microsoft 365
Support topics related to Office365, and Microsoft Products
-
- Availability in Microsoft Teams
- Create a Microsoft Team for My D2L Course
- Download Teams on your Mobile Device
- Factory Reset Yealink MP54
- How to install Microsoft Teams on Iphone or Android
- Join Class Meeting on Teams
- Making Calls in Microsoft Teams
- Microphone doesn't work in Microsoft Teams
- Microsoft Teams Guide
- Scheduling Class Meetings in Teams
- Share a File with Microsoft Teams
- Sync Teams Channel Folder to One Drive on Local Device
- Teams Live Events
- Toggle Call Queues in Microsoft Teams
- Show all articles ( 11 ) Collapse Articles
- Access a Video File in Microsoft Stream
- Accessibility Checker in Microsoft Office
- Add a Delegate from O365 Web App
- Add your Office 365 Account to Outlook
- Blocked Email
- Clearing the Outlook Autocomplete E-mail Cache
- Create a Microsoft Form
- How do I add audio to my PowerPoint?
- How to check my M365 mailbox usage?
- How to install Office 365 from Software Center on SIU owned computers.
- Identifying and Reporting Email Scams
- Logging into Microsoft Forms
- Manage Share Settings in Microsoft Stream
- Microsoft Authenticator for current Students, Faculty & Staff
- Microsoft Authenticator for Retirees & Alumni
- Microsoft Bookings Guide
- Microsoft FindTime
- Microsoft Office Training and Support
- Microsoft Stream Recording/Sharing Processes
- Microsoft Word Guide
- My OneDrive Icon is Missing
- Office 365 for Android Devices
- Office 365 for iOS Devices
- Office 365 for Other Devices
- Office 365 for Windows Devices
- Office365 won't open .ics file
- OneNote Help & Training
- Remove Contact from Office 365
- Request a Room for Outlook/Teams Meetings
- Share a File with Microsoft Teams
- Share a File with OneDrive
- Share a Video File in Microsoft Stream
- Shared Mailbox
- SIU Email Access
- SIU Email Signature Instructions
- Upload a File to Microsoft Stream
- Upload a File to OneDrive
- Video Chapters in Microsoft Stream
- Video Comment in Microsoft Stream
- Video Information in Microsoft Stream
- Video Thumbnail in Microsoft Stream
- Video Transcript in Microsoft Stream
- Virtual Fax Instructions
- Show all articles ( 40 ) Collapse Articles
-
-
D2L Brightspace
- Adding a Link In Announcement to Content
- Adding a Participant to Course in D2L
- Adding a Teaching Assistant (TA) to Course in D2L
- Adding You-Attend for Attendance in D2L
- Brightspace Training Sessions
- Change Course Offering Information in D2L
- Copy Your Course Content from Previous Semester in D2L
- Create a Microsoft Team for My D2L Course
- Creating Break-Out Group Discussion Boards
- Creating Discussions in D2L (MyCourses)
- Creating/Editing Announcements in D2L (MyCourses)
- D2L Course Merge Guide
- D2L Intelligent Agents
- D2L Quick Guide: Using the Course Builder Tool
- Display Current Courses on D2L Course Homepage
- Echo 360 Instructor Guide
- Echo 360 Video Won't Play on Chromebook
- Emailing the Class in D2L (MyCourses)
- Formatting Guidelines for Respondus 4.0 Exam Converter
- Getting Help with D2L
- Getting Started with Creator + in D2L
- Give Students Special Access to Course Quiz in D2L
- Grading Tool in D2L (MyCourses)
- How do I randomize quiz questions in D2L?
- How to Access Quiz Feedback on D2L
- How to Add Instructor Profile on D2L Course Homepage
- How to Add Resources for Salukis Widget to a D2L Course Homepage
- How to Add Upload Content to your Course
- How to Attend a Virtual Classroom Session
- How to change course navigation from menu bar (list) to icon-based
- How to Change Participant Roles in D2L
- How to Create a Video Assignment in D2L
- How to Create Assignments in D2L
- How to Display Quiz Feedback on D2L
- How to Email Instructor and Classmates in D2L
- How to Get Started with Virtual Classrooms in D2L
- How to Give Students Special Access to Course Assignment in D2L
- How to Login and Navigate a course in D2L
- How to post a quiz with time restriction in D2L
- How to Post on Discussion Boards in D2L
- How to Set-up Notifications in D2L (students/learners)
- How to Take Quizzes in D2L
- How to Upload Assignments in D2L
- How to Use D2L Content
- How to Use D2L on Your iPhone or iPad
- How to Use D2L on Your Laptop
- Import a Course from Another Learning Management System
- LockDown Browser and Respondus Monitor Instructor Guide
- Lockdown Browser Guide for Students
- Readspeaker in D2L
- Requesting D2L Brightspace and Instructional Support Services from CTE
- Setting Up Assignments and Linking to the Gradebook in D2L (MyCourses)
- SIU Live Recording
- This Quick Guide will help you learn How to Add a Participant to Course in D2L
- Update your profile picture in D2L Brightspace
- Using CopyLeaks in D2L
- Using Respondus 4 with VDI
- Work to Do Widget in D2L
- Show all articles ( 55 ) Collapse Articles
-
Account Help
Login support for all SIU accounts.
- Account Lockouts
- AIS reports not opening with Word
- BigDawg Access
- Changing Display Settings in Windows
- Changing Preferred First Name or Email Address
- Claim your Network ID
- Connecting to Eduroam with Mac OSX
- Departmental ID or Out-of-band (OOB) Network ID Account
- Emergency Alerts
- How do I access my SIU email?
- How Do I Change My SIU Account Password?
- How to add a shortcut in file explorer to a OneDrive folder
- How to sign into a Teams Phone
- How to Update Your Recovery Information
- How to View Telecom Billing
- Instructions for changing database connections in Golden
- Microsoft Authenticator for current Students, Faculty & Staff
- Microsoft Authenticator for Retirees & Alumni
- Office 365 - Modify members of a distribution list (OWA)
- Passwordless MFA Sign-in (Android)
- Proxy Account Setup
- SalukiNet Proxy FAQ's for Students
- Setting up a Network ID account for a Local Administrator
- SIU Email Access
- SIU Network ID-General Information
- SIUC LastPass
- Student Proxy Setup
- Troubleshooting the Housing Portal
- Using the Electronic Whiteboard and Document Camera
- What is my SIU email address?
- Yubikey Hardware Device Instructions - MacOSX
- Yubikey Hardware Device Instructions - Windows
- Yubikey Hardware Instructions - Linux
- Show all articles ( 30 ) Collapse Articles
-
Remote Access
Access to SIU's VPN, Remote Desktop Access, and Virtual Desktop Instances.
-
WiFi and Internet
Network and Internet connectivity issues, for SIU supported networks and off-campus SIU device connectivity.
- Account Lockouts
- Connecting to Eduroam with Android devices
- Connecting to Eduroam with Apple Iphone or Ipad
- Connecting to Eduroam with Linux
- Connecting to Eduroam with Windows
- Connecting to SIU Limited a Smart Device or Game Console
- Connecting to SIU-Guest
- Eduroam Support for Older Devices
- How do I clear my browser cache and cookies?
- Secure a Compromised Email Account
- SIU Wireless Connection Guide
- Troubleshooting Eduroam for IOS devices
- Troubleshooting Eduroam for Mac devices
- Troubleshooting Eduroam for Windows Devices
- Show all articles ( 11 ) Collapse Articles
-
SIU Digital Services
Support for online resources, such as MoveIT, HRSS, SalukiNet, and more.
- AIS PDF authentication error
- AIS reports not opening with Word
- Golden Software Help
- How to Obtain an Unofficial Transcript
- Instructions for changing database connections in Golden
- Lockdown Browser Guide for Students
- MOVEit User Guide
- Setting Up a Google Analytics Account with an SIU Email Address
- Setup Weekly Identity Scan for Spirion
- Spirion Identity Finder
- Working Remotely
- Show all articles ( 8 ) Collapse Articles
-
Computer Help
General SIU Computer Topics
- Adding a Sharp Printer to a Personal Computer
- Apple/Mac, Big Sur OS Breaks AIS Report Viewing/Printing
- Blue Screen Printing Fix
- Class Technology Troubleshooting
- Connecting to SIU Limited a Smart Device or Game Console
- Finding Computer Name on a Mac
- Finding Computer Name on Windows
- Force Chrome and Edge to Download PDF Forms
- Force Microsoft Edge to Open a PDF Externally
- How do I clear my browser cache and cookies?
- How do I open a private web browser window?
- Learn about ithelp portal
- Local Repair Facilities
- MOVEit User Guide
- Restoring Firefox Bookmarks
- Secure a Compromised Email Account
- Setup Weekly Identity Scan for Spirion
- SIU Email Signature Instructions
- SIU Live Recording
- SIU VPN Guide
- Troubleshooting projector issues in CLC classrooms
- Using Quick Assist
- What computer should I buy?
- Working Remotely
- Show all articles ( 21 ) Collapse Articles
-
FAQs
Category description
- Adding a Sharp Printer to a Personal Computer
- Changing Preferred First Name or Email Address
- Golden Software Help
- How do faculty enter grades?
- How to get service or order supplies for your GFI Copier/Printer
- How to register for classes on mobile
- How to Use D2L on Your iPhone or iPad
- How to Use D2L on Your Laptop
- How to use the Microfilm Scanner at Morris Library
- How to use User Codes with GFI Sharp Multi-function Printers
- I received an email titled "Action Required: Renew (course info)(semester) by (expiration date)"
- Identifying and Reporting Email Scams
- Mapping a Network Drive
- Microsoft Company Portal
- PDF not opening with Adobe
- Rebooting The KIC Book Scanner
- SalukiNet Proxy FAQ's for Students
- Self Service Registration Guide
- SIU Email Access
- Unable to Sign into myfuture.siu.edu to Submit Application or Sign Up for Orientation
- What computer should I buy?
- What is my SIU email address?
- Show all articles ( 19 ) Collapse Articles
-
Mobile Device Support
A collection of topics for mobile devices like phones and tablets.
- Connecting to Eduroam with Android devices
- Download Teams on your Mobile Device
- Emergency Alerts
- How to install Microsoft Teams on Iphone or Android
- Microsoft Authenticator for current Students, Faculty & Staff
- Obtain access to a shared network file share via SMB on a iOS device.
- Office 365 for Android Devices
- Office 365 for iOS Devices
- Office 365 for Other Devices
- Passwordless MFA Sign-in (Android)
- Troubleshooting Eduroam for IOS devices
- Show all articles ( 8 ) Collapse Articles
-
Campus Printing
How to print on the Carbondale campus including mobile printing resources and from SIU equipment.
-
Software Guides
Support for SIU distributed software offerings.
- Activate Wolfram Mathematica
- Adobe Acrobat Pro - Adding a Checkbox (with Either/or Options)
- Adobe Freezes While Adding Signature
- Adobe Sign in Acrobat Pro Basics
- Adobe Signature Box Fix - non-Entrust
- Create a survey with SurveyMonkey
- EMS Desktop Client Installation
- ERDAS IMAGINE 2022: Installation
- ERDAS IMAGINE 2022: Manual Installation
- Finding Computer Name on a Mac
- Finding Computer Name on Windows
- Google Career Certificates and AI Essentials
- Install Adobe Acrobat on Your Personal Computer
- Install Adobe Creative Cloud on Your Personal Computer
- Install ArcGIS CityEngine on Your Personal Computer
- Install ArcGIS Drone2Map on Your Personal Computer
- Install ArcGIS Pro on Your Personal Computer
- Install Autodesk Software on Your Personal Computer
- Install EndNote on Your Personal Computer
- Install JMP Pro on Your Personal Computer
- Install JMP Student Edition on Your Personal Computer
- Install MATLAB on Your Personal Computer
- Install Microsoft 365 Apps (Microsoft Office) on Your Personal Computer
- Install Microsoft Azure Dev Tools for Teaching on Your Personal Computer
- Install SPSS Statistics on Your Personal Computer
- Install Wolfram Mathematica on Your Personal Computer
- Microsoft Company Portal
- Microsoft Software Center
- PDF not opening with Adobe
- Qualtrics
- SAS 9.4M7 for Windows: Manual Installation
- SAS 9.4M8: Installation
- Sign In Adobe Acrobat Sign
- Sign In Adobe Express
- Sign in Adobe Firefly
- Sign In Adobe Fonts
- Sign In Adobe Stock
- Sign In ArcGIS Field Maps
- Sign in ArcGIS Online
- Sign in ArcGIS QuickCapture
- Sign In ArcGIS Survey123
- Sign In MATLAB Academy
- Sign In MATLAB Drive
- Sign In MATLAB Mobile
- Sign In MATLAB Online
- Sign In Simulink Online
- Sign In/Activate Adobe Acrobat
- Sign In/Activate Adobe Creative Cloud
- Sign In/Activate ArcGIS CityEngine
- Sign In/Activate ArcGIS Drone2Map
- Sign In/Activate ArcGIS Pro
- Sign In/Activate JMP Student Edition
- Sign In/Activate MATLAB
- Sign In/Activate Microsoft 365 Apps (Microsoft Office)
- Software Request
- SurveyMonkey
- Update MATLAB License
- Using VDI Computers on Campus
- Virtual Desktop Infrastructure (VDI) Guide
- Show all articles ( 56 ) Collapse Articles
-
Classroom Technology
KB articles focusing on the technology within SIU's smart classrooms
Yubikey Hardware Instructions – Linux
0 out Of 5 Stars
| 5 Stars | 0% | |
| 4 Stars | 0% | |
| 3 Stars | 0% | |
| 2 Stars | 0% | |
| 1 Stars | 0% |
Overview
This guide will walk users and technical staff through the setup, configuration, and other methods of manipulating a hardware key used in Multi-Factor Authentication on (most) Linux distributions.
Technical note: These instructions work for the Yubikeys supplied by the university for those who traded in their Duo token. If you purchase your own key, these instructions work with the newer Yubikey FIDO 2 keys, including the Security Key (C) (NFC), YubiKey 5(C) (NFC), and YubiKey 5(C) (NFC) FIPS. They may generally work for most FIDO 2 devices.
Please contact SalukiTech if you have any questions on purchasing your own Yubikey if you do not have a Duo token to exchange.
Creating a PIN on Linux for a Yubikey / FIDO2 Device
ATTENTION: If you are setting up a new Yubikey / FIDO2 Device for the first time on a Linux device, you must configure it with a security key PIN first. To do this you need to download the Yubikey Manager from Yubico.
- Open a browser go to the Yubico Manager website: https://www.yubico.com/support/download/yubikey-manager/
- Download the Appimage file, or another file appropriate for your distribution.
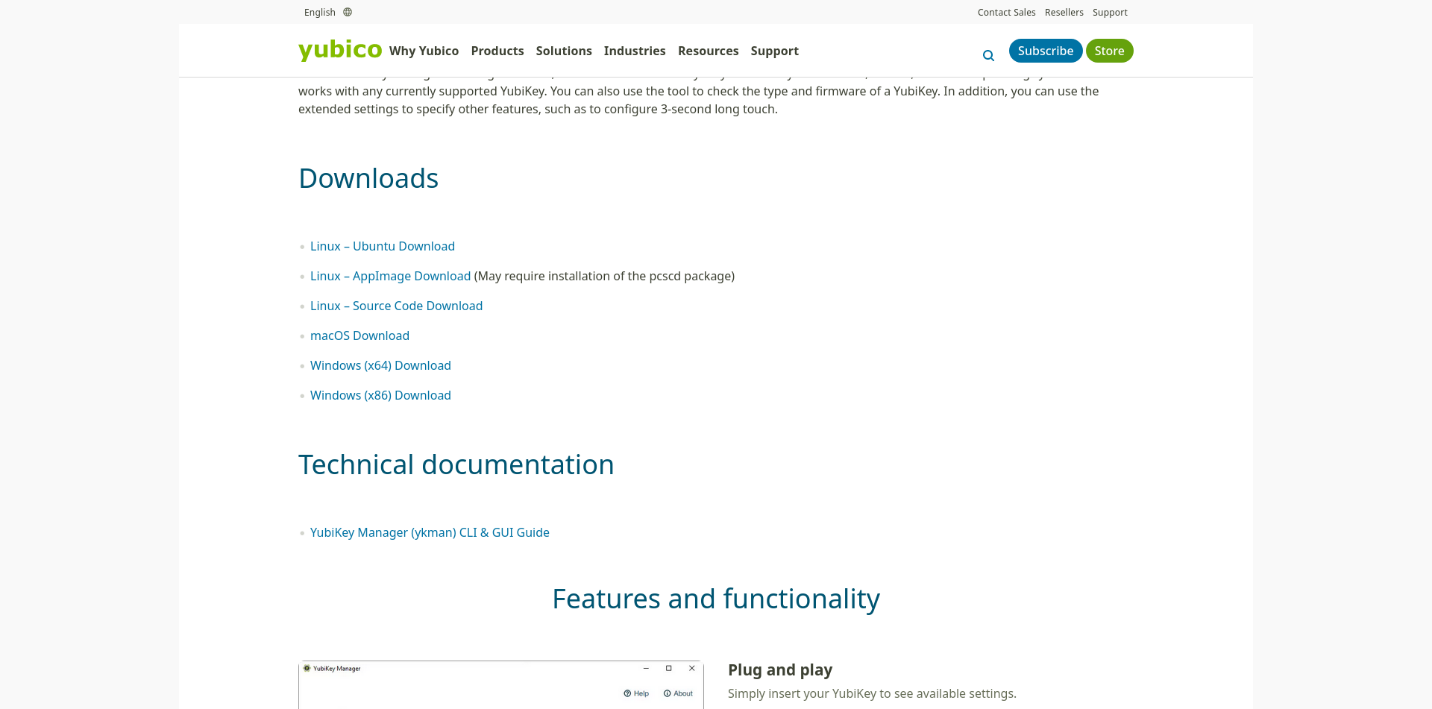
- After the Yubikey Manager download is complete it will be in your ‘Downloads’ folder, or otherwise on your system where downloaded files go. Double click to run and install.
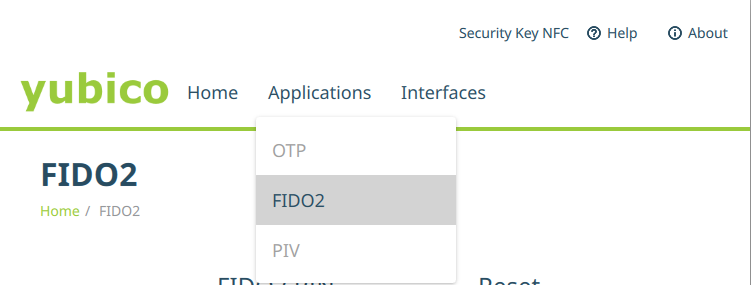
- After installation is complete, open it and go to Applications -> FIDO2
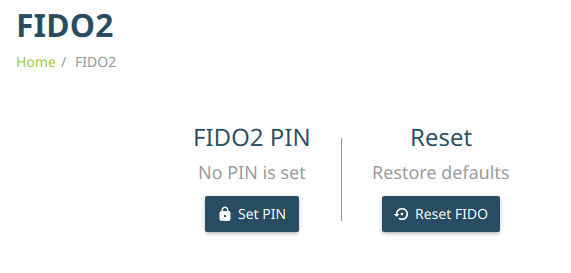
- Click ‘Set PIN’
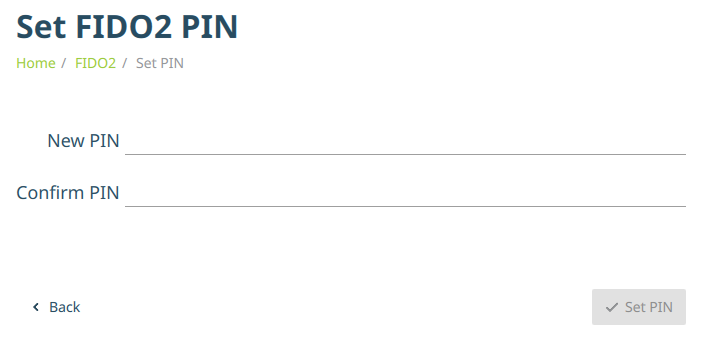
- Enter the new PIN twice.
Adding a Hardware Token to your SIU / Microsoft Account
- Logon to office.siu.edu, click your profile and go to ‘My Account’ then ‘Security Info’. You can also head there directly at https://mysignins.microsoft.com/security-info
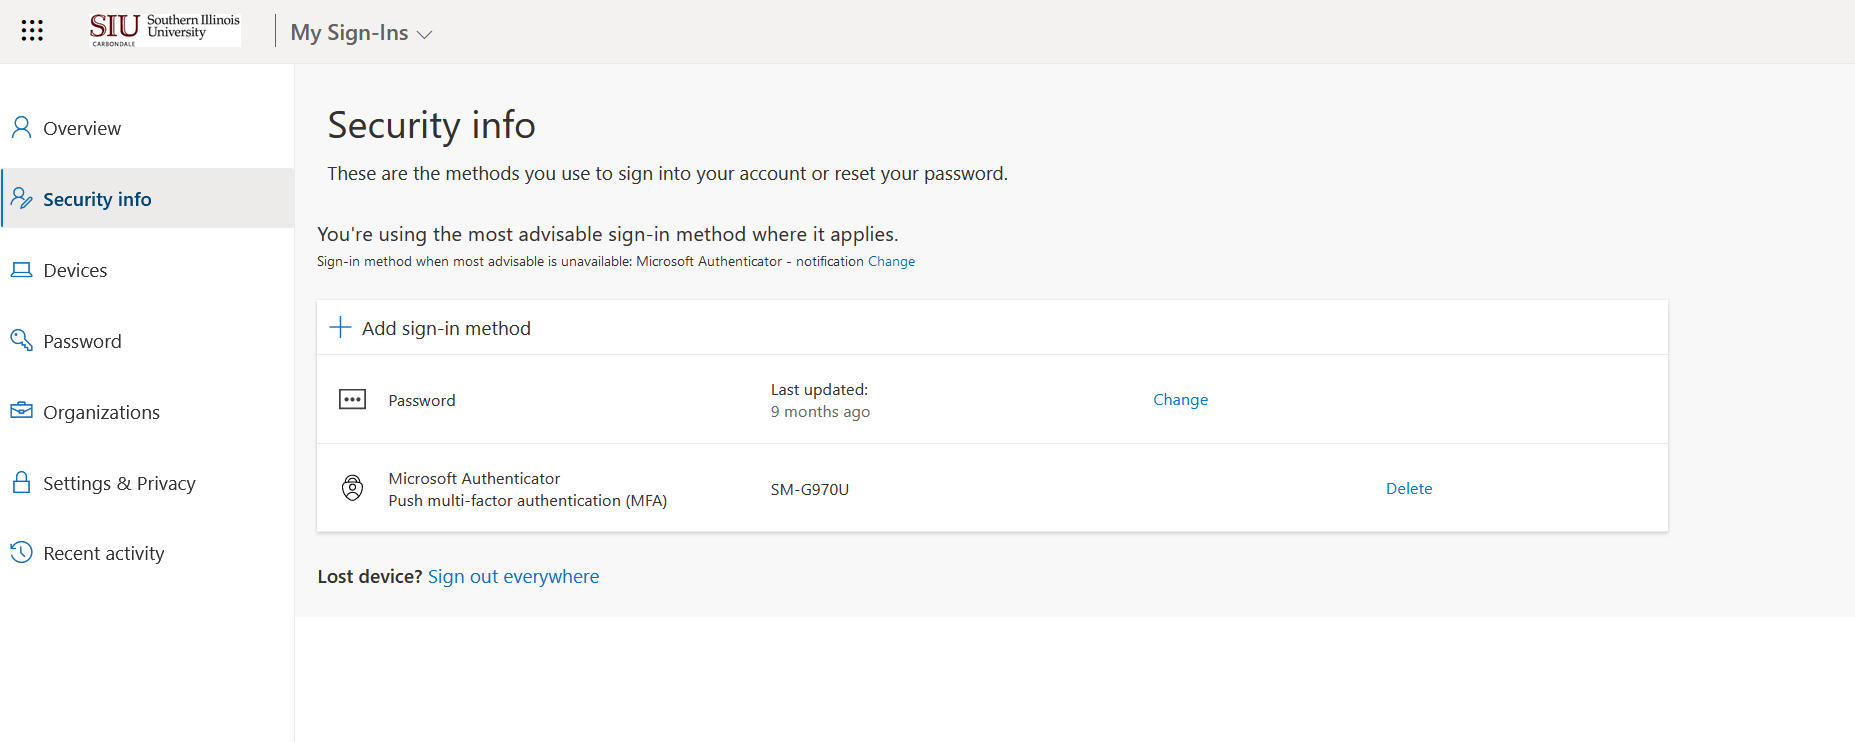
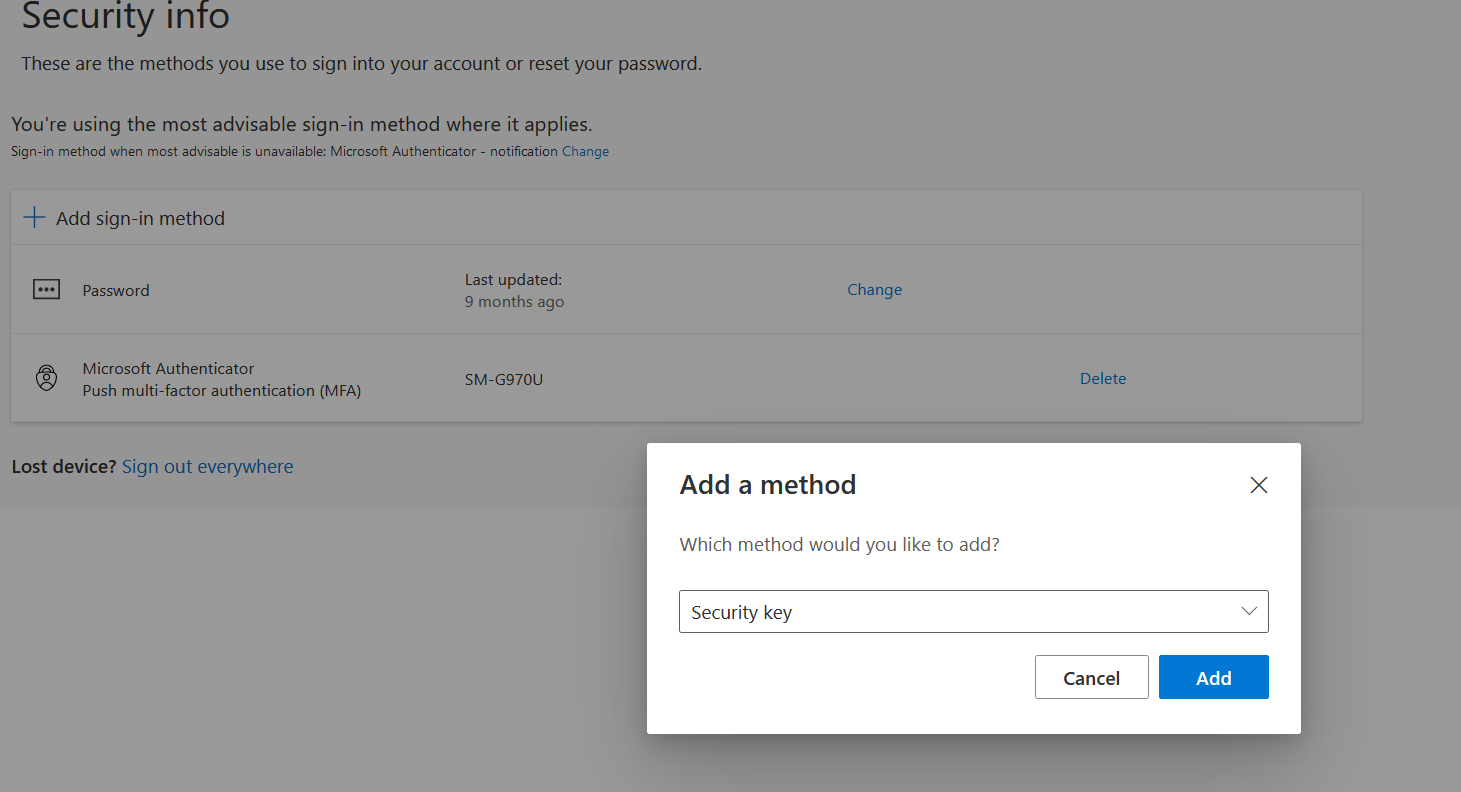
- Click ‘Add sign-in method’ select ‘Security Key’ and click ‘Add’.
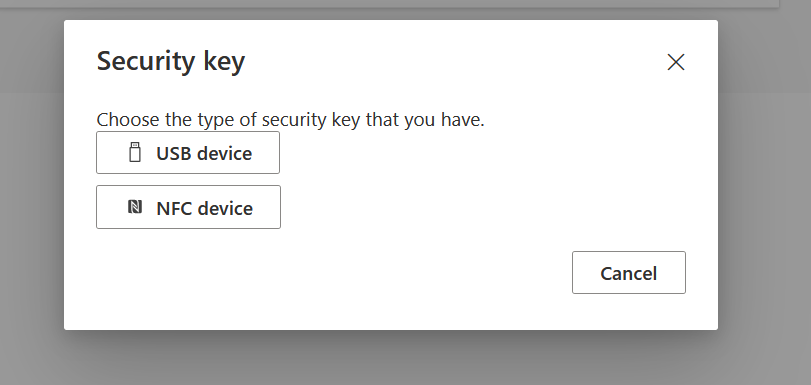
- Select USB, or NFC if you are operating your NFC-capable hardware token via a mobile device.
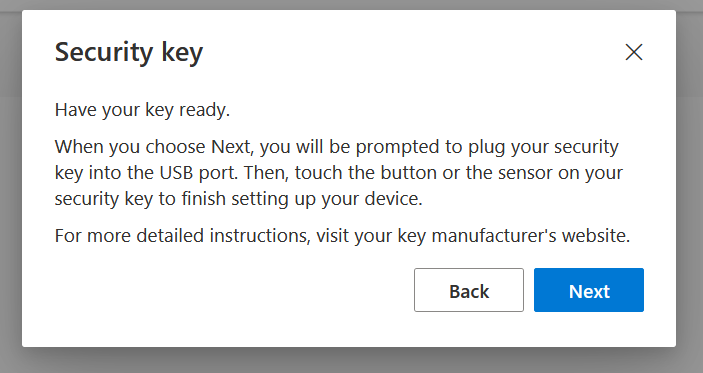
- You will now be advised to have you key ready and click ‘Next’.
- The browser will alert you that Microsoft (login.microsoft.com) is requesting information to complete the setup, this includes items like the serial number of the device. Click ‘Proceed’.
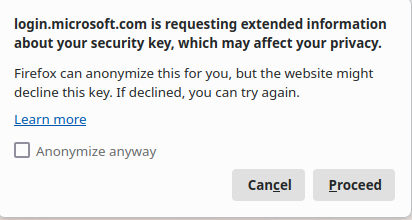
- You will see your e-mail address listed as logging into login.microsoft.com. If your e-mail address is correct click ‘OK’.
- You will be prompted to enter your PIN from the hardware token, if used previously, or set one up now.
SIU recommends a 6-character password for your Yubikey. This doesn’t have to be overly complex, and should be something you can/will remember. Entering this wrong 8 or more times will reset the device. - You will be asked to Touch the security key and/or enter your PIN to confirm.

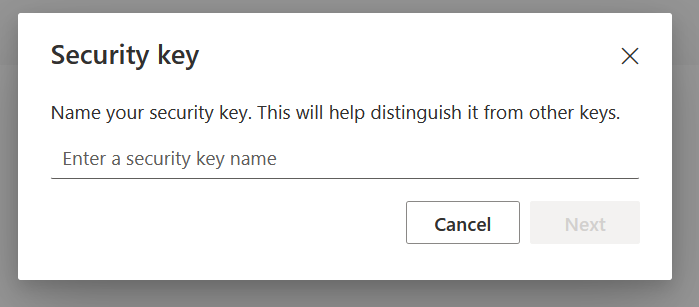
- You will be asked to enter a name for this key. This is for your reference only and mostly used for those individuals who have multiple hardware tokens. Click ‘Next’ when done.
0 out Of 5 Stars
| 5 Stars | 0% | |
| 4 Stars | 0% | |
| 3 Stars | 0% | |
| 2 Stars | 0% | |
| 1 Stars | 0% |
