How Can We Help?
-
Featured Issues
KB articles focusing on current problems and critical resolutions.
- Adding a Sharp Printer to a Personal Computer
- Adobe Sign in Acrobat Pro Basics
- Class Technology Troubleshooting
- Connecting to SIU Limited a Smart Device or Game Console
- Emergency Alerts
- Firewall Rule Request in Tikit
- Force Chrome and Edge to Download PDF Forms
- Force Microsoft Edge to Open a PDF Externally
- How do I print on campus?
- How to use User Codes with GFI Sharp Multi-function Printers
- I'm not receiving the email to reset my password from HRSS
- Making Calls in Microsoft Teams
- Proxy Account Setup
- Requesting D2L Brightspace and Instructional Support Services from CTE
- Self Service Registration Guide
- SIUC LastPass
- Student Proxy Setup
- Using Quick Assist
- Using VDI Computers on Campus
- Virtual Desktop Infrastructure (VDI) Guide
- Show all articles ( 17 ) Collapse Articles
-
Microsoft 365
Support topics related to Office365, and Microsoft Products
-
- Availability in Microsoft Teams
- Create a Microsoft Team for My D2L Course
- Download Teams on your Mobile Device
- Factory Reset Yealink MP54
- How to install Microsoft Teams on Iphone or Android
- Join Class Meeting on Teams
- Making Calls in Microsoft Teams
- Microphone doesn't work in Microsoft Teams
- Microsoft Teams Guide
- Scheduling Class Meetings in Teams
- Share a File with Microsoft Teams
- Sync Teams Channel Folder to One Drive on Local Device
- Teams Live Events
- Toggle Call Queues in Microsoft Teams
- Show all articles ( 11 ) Collapse Articles
- Access a Video File in Microsoft Stream
- Accessibility Checker in Microsoft Office
- Add a Delegate from O365 Web App
- Add your Office 365 Account to Outlook
- Blocked Email
- Clearing the Outlook Autocomplete E-mail Cache
- Create a Microsoft Form
- How do I add audio to my PowerPoint?
- How to check my M365 mailbox usage?
- How to install Office 365 from Software Center on SIU owned computers.
- Identifying and Reporting Email Scams
- Logging into Microsoft Forms
- Manage Share Settings in Microsoft Stream
- Microsoft Authenticator for current Students, Faculty & Staff
- Microsoft Authenticator for Retirees & Alumni
- Microsoft Bookings Guide
- Microsoft FindTime
- Microsoft Office Training and Support
- Microsoft Stream Recording/Sharing Processes
- Microsoft Word Guide
- My OneDrive Icon is Missing
- Office 365 for Android Devices
- Office 365 for iOS Devices
- Office 365 for Other Devices
- Office 365 for Windows Devices
- Office365 won't open .ics file
- OneNote Help & Training
- Remove Contact from Office 365
- Request a Room for Outlook/Teams Meetings
- Share a File with Microsoft Teams
- Share a File with OneDrive
- Share a Video File in Microsoft Stream
- Shared Mailbox
- SIU Email Access
- SIU Email Signature Instructions
- Upload a File to Microsoft Stream
- Upload a File to OneDrive
- Video Chapters in Microsoft Stream
- Video Comment in Microsoft Stream
- Video Information in Microsoft Stream
- Video Thumbnail in Microsoft Stream
- Video Transcript in Microsoft Stream
- Virtual Fax Instructions
- Show all articles ( 40 ) Collapse Articles
-
-
D2L Brightspace
- Adding a Link In Announcement to Content
- Adding a Participant to Course in D2L
- Adding a Teaching Assistant (TA) to Course in D2L
- Adding You-Attend for Attendance in D2L
- Brightspace Training Sessions
- Change Course Offering Information in D2L
- Copy Your Course Content from Previous Semester in D2L
- Create a Microsoft Team for My D2L Course
- Creating Break-Out Group Discussion Boards
- Creating Discussions in D2L (MyCourses)
- Creating/Editing Announcements in D2L (MyCourses)
- D2L Course Merge Guide
- D2L Intelligent Agents
- D2L Quick Guide: Using the Course Builder Tool
- Display Current Courses on D2L Course Homepage
- Echo 360 Instructor Guide
- Echo 360 Video Won't Play on Chromebook
- Emailing the Class in D2L (MyCourses)
- Formatting Guidelines for Respondus 4.0 Exam Converter
- Getting Help with D2L
- Getting Started with Creator + in D2L
- Give Students Special Access to Course Quiz in D2L
- Grading Tool in D2L (MyCourses)
- How do I randomize quiz questions in D2L?
- How to Access Quiz Feedback on D2L
- How to Add Instructor Profile on D2L Course Homepage
- How to Add Resources for Salukis Widget to a D2L Course Homepage
- How to Add Upload Content to your Course
- How to Attend a Virtual Classroom Session
- How to change course navigation from menu bar (list) to icon-based
- How to Change Participant Roles in D2L
- How to Create a Video Assignment in D2L
- How to Create Assignments in D2L
- How to Display Quiz Feedback on D2L
- How to Email Instructor and Classmates in D2L
- How to Get Started with Virtual Classrooms in D2L
- How to Give Students Special Access to Course Assignment in D2L
- How to Login and Navigate a course in D2L
- How to post a quiz with time restriction in D2L
- How to Post on Discussion Boards in D2L
- How to Set-up Notifications in D2L (students/learners)
- How to Take Quizzes in D2L
- How to Upload Assignments in D2L
- How to Use D2L Content
- How to Use D2L on Your iPhone or iPad
- How to Use D2L on Your Laptop
- Import a Course from Another Learning Management System
- LockDown Browser and Respondus Monitor Instructor Guide
- Lockdown Browser Guide for Students
- Readspeaker in D2L
- Requesting D2L Brightspace and Instructional Support Services from CTE
- Setting Up Assignments and Linking to the Gradebook in D2L (MyCourses)
- SIU Live Recording
- This Quick Guide will help you learn How to Add a Participant to Course in D2L
- Update your profile picture in D2L Brightspace
- Using CopyLeaks in D2L
- Using Respondus 4 with VDI
- Work to Do Widget in D2L
- Show all articles ( 55 ) Collapse Articles
-
Account Help
Login support for all SIU accounts.
- Account Lockouts
- AIS reports not opening with Word
- BigDawg Access
- Changing Display Settings in Windows
- Changing Preferred First Name or Email Address
- Claim your Network ID
- Connecting to Eduroam with Mac OSX
- Departmental ID or Out-of-band (OOB) Network ID Account
- Emergency Alerts
- How do I access my SIU email?
- How Do I Change My SIU Account Password?
- How to add a shortcut in file explorer to a OneDrive folder
- How to sign into a Teams Phone
- How to Update Your Recovery Information
- How to View Telecom Billing
- Instructions for changing database connections in Golden
- Microsoft Authenticator for current Students, Faculty & Staff
- Microsoft Authenticator for Retirees & Alumni
- Office 365 - Modify members of a distribution list (OWA)
- Passwordless MFA Sign-in (Android)
- Proxy Account Setup
- SalukiNet Proxy FAQ's for Students
- Setting up a Network ID account for a Local Administrator
- SIU Email Access
- SIU Network ID-General Information
- SIUC LastPass
- Student Proxy Setup
- Troubleshooting the Housing Portal
- Using the Electronic Whiteboard and Document Camera
- What is my SIU email address?
- Yubikey Hardware Device Instructions - MacOSX
- Yubikey Hardware Device Instructions - Windows
- Yubikey Hardware Instructions - Linux
- Show all articles ( 30 ) Collapse Articles
-
Remote Access
Access to SIU's VPN, Remote Desktop Access, and Virtual Desktop Instances.
-
WiFi and Internet
Network and Internet connectivity issues, for SIU supported networks and off-campus SIU device connectivity.
- Account Lockouts
- Connecting to Eduroam with Android devices
- Connecting to Eduroam with Apple Iphone or Ipad
- Connecting to Eduroam with Linux
- Connecting to Eduroam with Windows
- Connecting to SIU Limited a Smart Device or Game Console
- Connecting to SIU-Guest
- Eduroam Support for Older Devices
- How do I clear my browser cache and cookies?
- Secure a Compromised Email Account
- SIU Wireless Connection Guide
- Troubleshooting Eduroam for IOS devices
- Troubleshooting Eduroam for Mac devices
- Troubleshooting Eduroam for Windows Devices
- Show all articles ( 11 ) Collapse Articles
-
SIU Digital Services
Support for online resources, such as MoveIT, HRSS, SalukiNet, and more.
- AIS PDF authentication error
- AIS reports not opening with Word
- Golden Software Help
- How to Obtain an Unofficial Transcript
- Instructions for changing database connections in Golden
- Lockdown Browser Guide for Students
- MOVEit User Guide
- Setting Up a Google Analytics Account with an SIU Email Address
- Setup Weekly Identity Scan for Spirion
- Spirion Identity Finder
- Working Remotely
- Show all articles ( 8 ) Collapse Articles
-
Computer Help
General SIU Computer Topics
- Adding a Sharp Printer to a Personal Computer
- Apple/Mac, Big Sur OS Breaks AIS Report Viewing/Printing
- Blue Screen Printing Fix
- Class Technology Troubleshooting
- Connecting to SIU Limited a Smart Device or Game Console
- Finding Computer Name on a Mac
- Finding Computer Name on Windows
- Force Chrome and Edge to Download PDF Forms
- Force Microsoft Edge to Open a PDF Externally
- How do I clear my browser cache and cookies?
- How do I open a private web browser window?
- Learn about ithelp portal
- Local Repair Facilities
- MOVEit User Guide
- Restoring Firefox Bookmarks
- Secure a Compromised Email Account
- Setup Weekly Identity Scan for Spirion
- SIU Email Signature Instructions
- SIU Live Recording
- SIU VPN Guide
- Troubleshooting projector issues in CLC classrooms
- Using Quick Assist
- What computer should I buy?
- Working Remotely
- Show all articles ( 21 ) Collapse Articles
-
FAQs
Category description
- Adding a Sharp Printer to a Personal Computer
- Changing Preferred First Name or Email Address
- Golden Software Help
- How do faculty enter grades?
- How to get service or order supplies for your GFI Copier/Printer
- How to register for classes on mobile
- How to Use D2L on Your iPhone or iPad
- How to Use D2L on Your Laptop
- How to use the Microfilm Scanner at Morris Library
- How to use User Codes with GFI Sharp Multi-function Printers
- I received an email titled "Action Required: Renew (course info)(semester) by (expiration date)"
- Identifying and Reporting Email Scams
- Mapping a Network Drive
- Microsoft Company Portal
- PDF not opening with Adobe
- Rebooting The KIC Book Scanner
- SalukiNet Proxy FAQ's for Students
- Self Service Registration Guide
- SIU Email Access
- Unable to Sign into myfuture.siu.edu to Submit Application or Sign Up for Orientation
- What computer should I buy?
- What is my SIU email address?
- Show all articles ( 19 ) Collapse Articles
-
Mobile Device Support
A collection of topics for mobile devices like phones and tablets.
- Connecting to Eduroam with Android devices
- Download Teams on your Mobile Device
- Emergency Alerts
- How to install Microsoft Teams on Iphone or Android
- Microsoft Authenticator for current Students, Faculty & Staff
- Obtain access to a shared network file share via SMB on a iOS device.
- Office 365 for Android Devices
- Office 365 for iOS Devices
- Office 365 for Other Devices
- Passwordless MFA Sign-in (Android)
- Troubleshooting Eduroam for IOS devices
- Show all articles ( 8 ) Collapse Articles
-
Campus Printing
How to print on the Carbondale campus including mobile printing resources and from SIU equipment.
-
Software Guides
Support for SIU distributed software offerings.
- Activate Wolfram Mathematica
- Adobe Acrobat Pro - Adding a Checkbox (with Either/or Options)
- Adobe Freezes While Adding Signature
- Adobe Sign in Acrobat Pro Basics
- Adobe Signature Box Fix - non-Entrust
- Create a survey with SurveyMonkey
- EMS Desktop Client Installation
- ERDAS IMAGINE 2022: Installation
- ERDAS IMAGINE 2022: Manual Installation
- Finding Computer Name on a Mac
- Finding Computer Name on Windows
- Install Adobe Acrobat on Your Personal Computer
- Install Adobe Creative Cloud on Your Personal Computer
- Install ArcGIS CityEngine on Your Personal Computer
- Install ArcGIS Drone2Map on Your Personal Computer
- Install ArcGIS Pro on Your Personal Computer
- Install Autodesk Software on Your Personal Computer
- Install EndNote on Your Personal Computer
- Install JMP Pro on Your Personal Computer
- Install JMP Student Edition on Your Personal Computer
- Install MATLAB on Your Personal Computer
- Install Microsoft 365 Apps (Microsoft Office) on Your Personal Computer
- Install Microsoft Azure Dev Tools for Teaching on Your Personal Computer
- Install SPSS Statistics on Your Personal Computer
- Install Wolfram Mathematica on Your Personal Computer
- Microsoft Company Portal
- Microsoft Software Center
- PDF not opening with Adobe
- Qualtrics
- SAS 9.4M7 for Windows: Manual Installation
- SAS 9.4M8: Installation
- Sign In Adobe Acrobat Sign
- Sign In Adobe Express
- Sign in Adobe Firefly
- Sign In Adobe Fonts
- Sign In Adobe Stock
- Sign In ArcGIS Field Maps
- Sign in ArcGIS Online
- Sign in ArcGIS QuickCapture
- Sign In ArcGIS Survey123
- Sign In MATLAB Academy
- Sign In MATLAB Drive
- Sign In MATLAB Mobile
- Sign In MATLAB Online
- Sign In Simulink Online
- Sign In/Activate Adobe Acrobat
- Sign In/Activate Adobe Creative Cloud
- Sign In/Activate ArcGIS CityEngine
- Sign In/Activate ArcGIS Drone2Map
- Sign In/Activate ArcGIS Pro
- Sign In/Activate JMP Student Edition
- Sign In/Activate MATLAB
- Sign In/Activate Microsoft 365 Apps (Microsoft Office)
- Software Request
- SurveyMonkey
- Update MATLAB License
- Using VDI Computers on Campus
- Virtual Desktop Infrastructure (VDI) Guide
- Show all articles ( 55 ) Collapse Articles
-
Classroom Technology
KB articles focusing on the technology within SIU's smart classrooms
Adobe Acrobat Pro – Adding a Checkbox (with Either/or Options)
0.5 out Of 5 Stars
2 ratings
| 5 Stars | 0% | |
| 4 Stars | 0% | |
| 3 Stars | 0% | |
| 2 Stars | 0% | |
| 1 Stars | 100% |
Checkboxes are easy to add to a document but has a few attributes you must set before the checkboxes are available.
To have access to checkbox options (as well as other items you can add to documents):
Click the E-sign option at the top of the screen or the Request signature on the right-hand menu.
Step 1. Add recipients to sign the document.
Step 2. Click the Specify where to sign button.
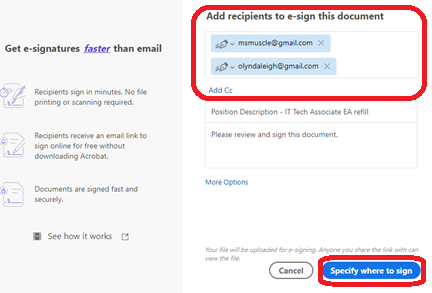
Step 3. Activate the “Advanced editing on” option by clicking the button. (Found on the top of the menu –right-hand side of the screen).
NOTE: This option only becomes available once you have created your signing list for the email and are ready to proceed to add signature boxes.

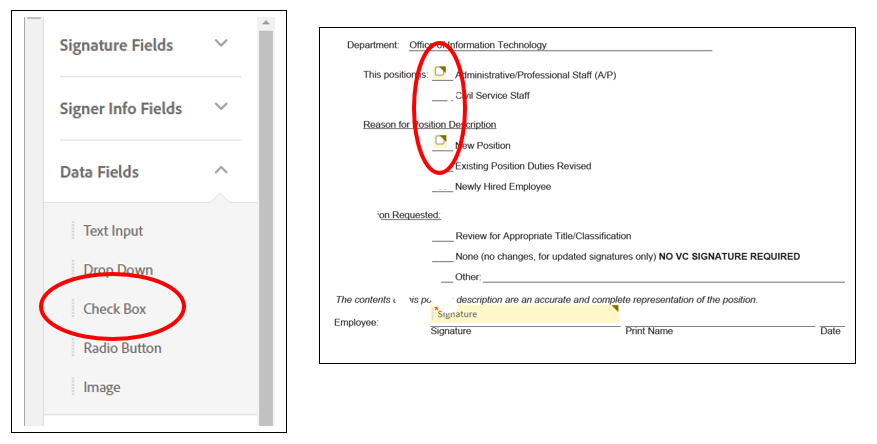
Step 4. Choose and position field for signatures or other information.
Step 5. Click the Data Fields option on the right-hand menu. Select the Check Box option.
Step 6. Click and Drag the checkbox option to the place where you want to insert a checkbox and release it. You will see a checkbox in the document
NOTE: If the purpose of the checkbox is obvious, you are ready to Send the Document.
Step 7. If you want to clarify how to use the checkbox, right-click the checkbox and select Edit from the dropdown menu.
NOTE: Checkboxes are like any other “signature” box. They are assigned to particular people for attention (unless otherwise specified). Use the Assign To field to select the signer who needs to check the box.
Step 8. Check the Required checkbox if the box must be checked.
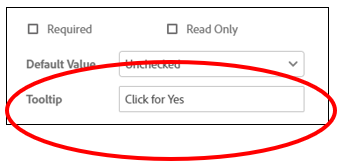
Step 9. Click on the Tooltip to “name/explain the box.”.
Example: If you want to have a checkbox for Yes and a checkbox for No, enter something like “Click for Yes” in the tooltip for the Yes checkbox, then when editing the information for the second checkbox enter “Click for No” in the tooltip field for the No checkbox. When the signer hovers over the checkbox it opens the tooltip explaining the checkbox’s purpose.
Step 10. Click Conditions to set specific conditions for this checkbox. If you have multiple fields and checkboxes, you must set conditions for each checkbox. By setting Conditions, you make the individual checkbox you are “editing” relative to other fields you have entered.
NOTE: The options available in Conditions change based on the types of actionable fields you have set up in the document you are currently working on.
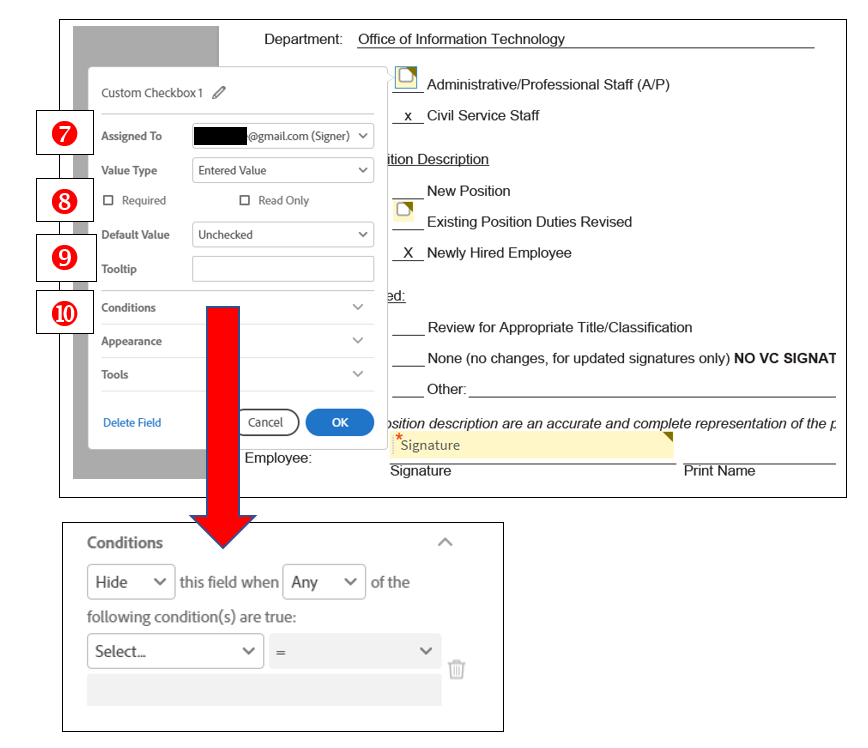
TIP: It will help you understand Conditions if you start with the word/action you choose in the first box and read text between the boxes and the text in the boxes.
Example: The Text box below reads, “Hide this field when Any of the following conditions are true…” and continues “…” Custom Checkbox 2 is Checked.”
This condition will hide the checkbox that I am currently editing if Custom Checkbox 2 (my other checkbox) is checked.
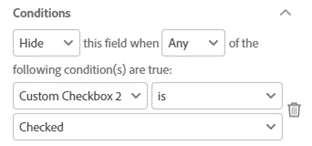
Step 11. Click the first box “Hide” to see what you can set the box to do when the conditions are met. Options include Show, Hide, Enable, Disable.
Step 12. Click the second box “Any” to determine what conditions must be met to affect the action you choose in the first box. Options include Any (meaning any of the conditions will cause the action in the first box.)
Step 13. Click the Select field to determine the field that interacts with or affects this checkbox, The Choices available in the third dropdown varies depending on the fields you enter in a document.
Example: if you have a second checkbox one choice will be Custom Checkbox (with a number). If you have entered a Signature field, you may decide that the Signature field affects the checkbox. If you set up multiple fields in the document, all of them will be available as choices in the Select field.
Step 14. Click the down arrow in the blank field after Select. Options here include actions such as “Is” or “Isn’t.” Selecting a choice in this field generate choices in the last blank field.
Step 15. Select a choice from the newly populated, final field. Again, the options available here will be dictated by the choice you made in the select field.
Example: If in the Select field you have the options Customer Checkbox 2 or Signature 1 (meaning you have put an additional checkbox in the document and a Signature field) and you choose Customer Checkbox 2, you will choose between the options Checked or Unchecked. If you were to select Signature 1, you would choose between the options Signed or Unsigned.
0.5 out Of 5 Stars
2 ratings
| 5 Stars | 0% | |
| 4 Stars | 0% | |
| 3 Stars | 0% | |
| 2 Stars | 0% | |
| 1 Stars | 100% |
